In this article, we will review the migration steps of the Trello -> Planner Basic (MS Planner) migration scenario.
To launch the migration from Trello to Planner Basic you will need to take several steps:
Step 1 - Connect to source and target systems
To start the migration process perform the following:
1. Open the Project Migrator home page and click on the 'Start New Migration' Button.

2. To select the source system, click on the 'Please Select System' button and Select Trello.

3. Click on the 'Connect' button to connect to your Trello account.

4. Provide your credentials and log in to Trello. Any Trello account can be used for migration from Trello to Planner Basic; however, the provided account should have access to the workspaces and boards selected for migration. For detailed information about the account requirements for Trello, please refer to this article.
Click 'Allow' in the 'Authorize Trello' window that appears.

Project Migrator will be successfully connected to your Trello account.

5. On the next step, connect the target system. To select the target system, click on the 'Please Select System' button and select Microsoft Planner or Planner (basic plans).

6. Click on the 'Connect' button to connect to your Planner Basic account.

7. Provide your credentials and log in to Planner Basic using your Office 365 account.
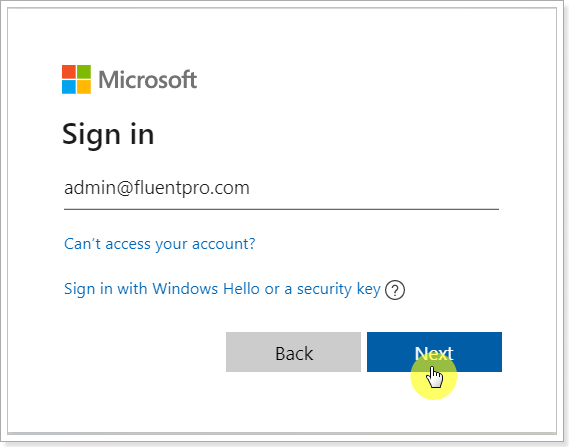
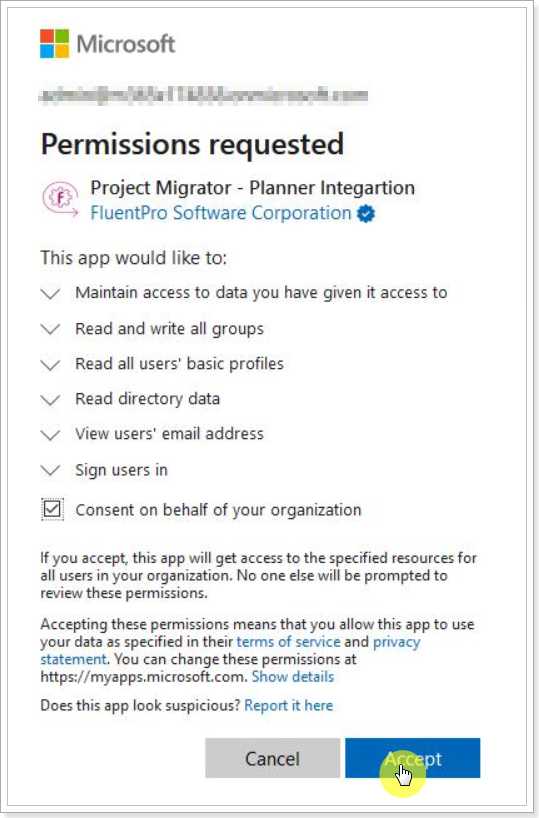
If you connect to Planner Basic for the first time, Global Administrator consent is required.
Before adding a connection for the first time, Office 365 tenant Global Administrator consent (Admin Consent) is required to grant Project Migrator app permissions to access Office 365. Admin Consent should be granted to Project Migrator only once. When the consent is granted by Global Admin, any other Planner Basic Account (that meets the requirements described in the 'Account requirements' article) can be used to add more connections within the same Office 365 tenant.
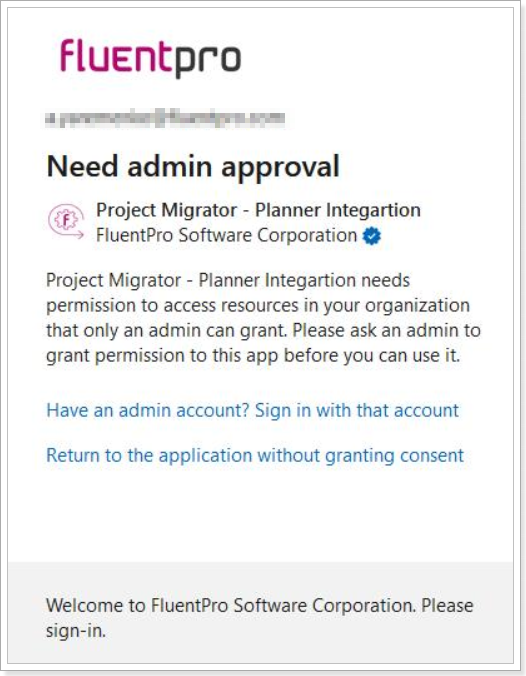
If you use an account that does not have Administrator permissions to add a Planner Basic connection for the first time, the 'Need Admin Approval' window will be opened instead. The 'Need Admin Approval' window may be opened after the login attempt. This window appears in case it is not allowed by your organization for users to add apps to the Office 365 tenant without admin approval.
In this case, contact your Planner application Global Administrator for Admin Consent, it is required to grant Project Migrator app permissions to access Office 365.
When the credentials are added once they are encrypted and stored for your convenience. The next time when you need to launch the migration process you can select from the list of credentials added before.
If you need to change the account you have provided click on the 'Change' button.

When the source and target systems are added and connected, you can proceed to the next step and select source data for migration.
Step 2 - Select source data
Project Migrator allows selecting all data for migration or only the required items from the list.

If you select 'All' option – all Public, Workspace Visible, Organization, and Private Boards that the Trello connection account has access to will be migrated.
'Selected' option allows migrating only the Boards which you select from the Available Boards list.
Click on the 'Selected' radio button.

Board Selection window will be opened displaying the available boards for selection. There are several fields on this page that you can use to filter the information out and make the selection faster.
Trello connection account you have provided on the first step will have access to the following boards:
- Public Boards where the connection account is added as a member.
- Workspace Visibility Boards - all Workspace Visible Boards where the account is added are available for selection (if the account is added to the Workspace, the Boards will be available for selection even if the account is not added as a member to the Board).
- Private Boards - only those Private Boards where the account is added as a member will be available for selection.
Please note: If the connection account is a Board member and is assigned for the Board Cards, but is not a member of the Workspace, such Boards will be available for selection with the 'Personal Cards' Workspace name.
Select the required boards from the list and click the 'Add Selected' button.

Please note: If you have not purchased any subscription plan yet, a free plan (for projects) will be applied. If you have exceeded the limit of projects that you can select for migration according to your subscription plan (free or paid one), you can upgrade your plan from this page directly by clicking on the 'Upgrade to (number) of projects plan' button.
Please note: Trello Boards are counted as projects.
For more information please refer to the 'Project Migrator Subscriptions' article.

When the items are selected, you can proceed to the next step: Step 3: Object Mapping.
Step 3 - Object mapping
1. Migration settings
Microsoft 365 Group Creation Mode: In this section, you can select whether to create groups with source workspace names, create groups using Board names, or create all Plans in one group (new or existing).
'Create groups using source workspace names’: this group creation mode allows preserving source workspace names for the selected Boards in the target. Target Microsoft 365 groups will be created with the same names as the source workspaces.
With this group creation mode, the Board members and users that are assigned to cards in the migrated source Board(s) will be added as members to the target Microsoft 365 group(s) on condition they are mapped with the corresponding target users.
The Workspace and Boards Privacy will not be preserved for the target group and Plan.
The users that are Workspace or Board Admins will not be added as owners to the target group(s).
Please note: If there is an existing group with the same name and mail nickname in the target tenant, but the connection account is not a member or an owner of that group, a new group will be created with a bit different mail nickname.

'Create groups using Board names': if this option is selected, each plan will have a separate group created. The groups will be created with the same names as the Board names in this case.
If a group with the same name already exists in Planner Basic, a new group will not be created. Project Migrator will find this group by name and will use it for migration (taking into account the setting below 'Create new or merge with existing Plans').
With this group creation mode, the Board members and users that are assigned to cards in the migrated source Board(s) will be added as members to the target Microsoft 365 group(s) on condition they are mapped with the corresponding target users.
The Workspace and Boards Privacy will not be preserved for the target group and Plan.
The users that are Workspace or Board Admins will not be added as owners to the target group(s).

If the 'Create all Plans in one group' option is selected, then all Boards/Plans will be added to the same group during migration.
Please note: With this group creation mode, all Board members and users that are assigned to cards in the migrated source Board(s) will be added as members to one target Microsoft 365 group on condition they are mapped with the corresponding target users.
Members of the source Board workspaces and guest users from other Boards will not be added to the target group.
The Workspace and Board Privacy will not be preserved for the target group and the Plan. The users who are Workspace or Board Admins will not be added as owners to the target group.
In the Group Name field, you can provide the name of an existing group or a new group name to create a new group during migration.
Please note: A Maximum of 200 Plans can be created in one Microsoft 365 group.
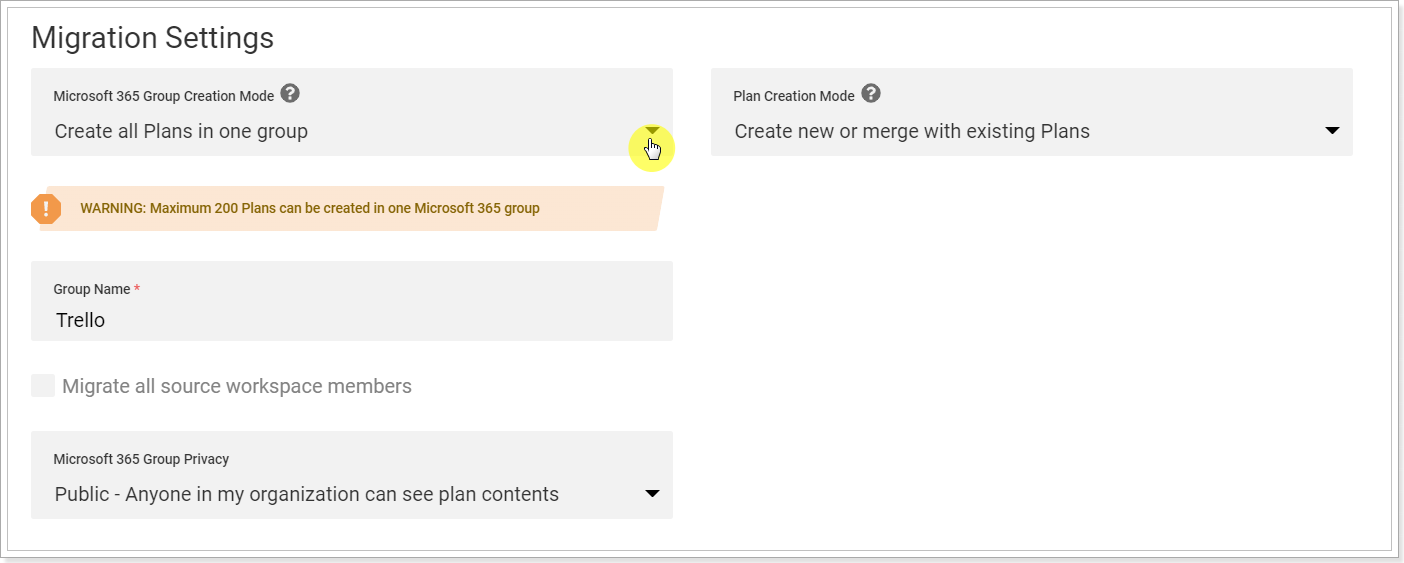
‘Migrate all source workspace members’: this option is available for all the group creation modes. If it is enabled, all members of the source Workspace (even if they are not added to the Board Members or assigned to the Board cards) where the selected Boards are placed will be added to the target Microsoft 365 group members on condition the corresponding users exist in the target tenant and are mapped correctly.
If that option is disabled, only the Board Members and users assigned to the cards in the migrated Boards will be added to the target group members. Other source workspace members and guests will not be added to the target groups. If new Microsoft 365 groups and Plans are created during the migration, the target migration account will be set as the group and Plan owner and member.
Please note: If you are migrating the Boards to an existing Planner group (or to different groups but there is a group(s) in Planner with the matching name), the target migration account that you have provided in the Target System section should be a member or an owner of that group in Planner Basic.
Microsoft 365 Group Privacy: This setting defines which privacy will have the created Office 365 groups (public or private).
Please note: Privacy settings are valid for new groups only, if the group already exists and the migration is performed to this group, the privacy settings will not be changed.
If the ‘Create groups using source Workspace names’ option is selected for ‘Microsoft 365 Group Creation Mode’ then 3 following options will be available for Microsoft 365 Group Privacy:
- Public - Anyone in my organization can see plan contents (if this option is selected then all created groups will be Public )
- Private - Only members I add can see plan contents (if this option is selected then all created groups will be Private)
- Create groups using source Workspace visibility
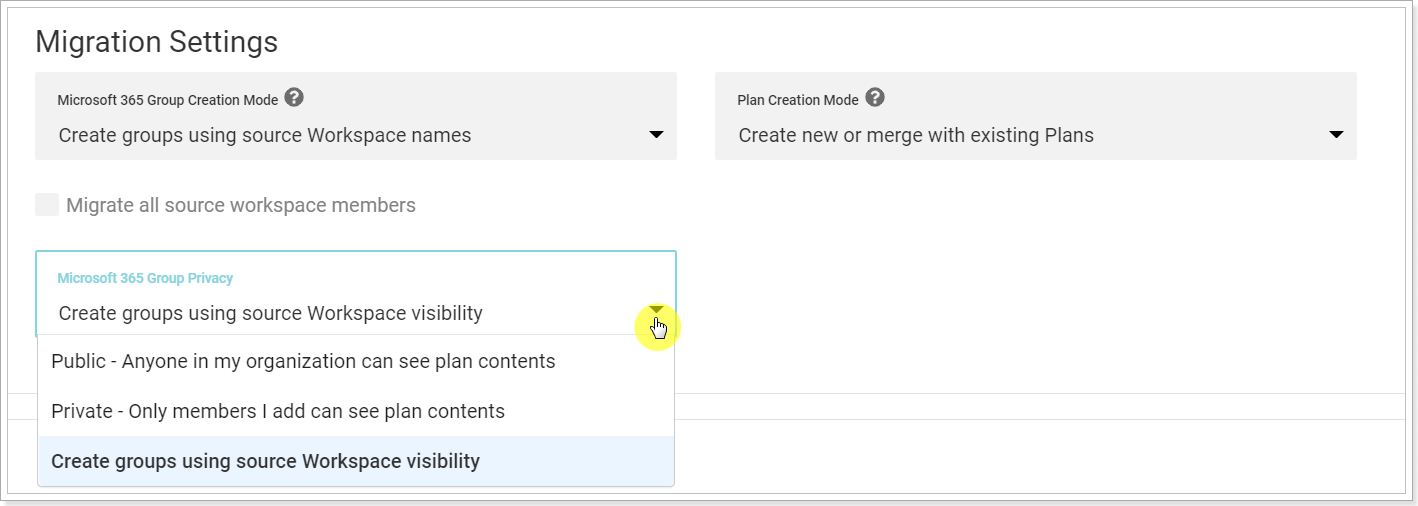
If the ‘Create groups using Board names’ option is selected for ‘Microsoft 365 Group Creation Mode’ then 3 following options will be available for Microsoft 365 Group Privacy:
- Public - Anyone in my organization can see plan contents
- Private - Only members I add can see plan contents
- Create groups using source Board visibility
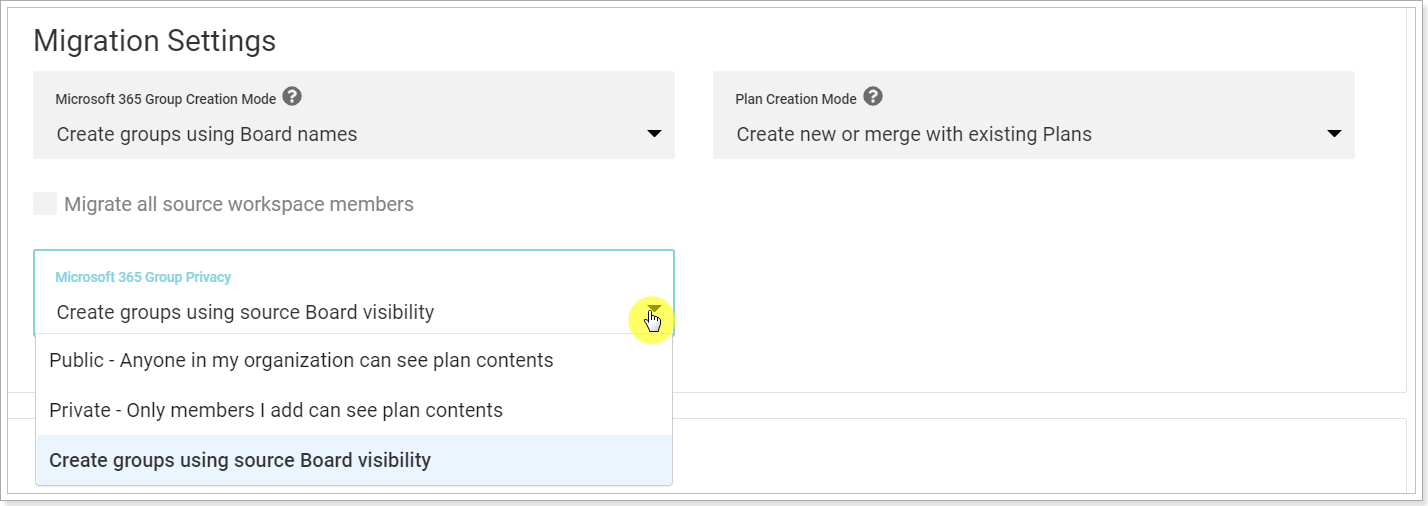
If the ‘Create all Plans in one group’ option is selected for ‘Microsoft 365 Group Creation Mode’ then 2 following options will be available for Microsoft 365 Group Privacy:
- Public - Anyone in my organization can see plan contents
- Private - Only members I add can see plan contents
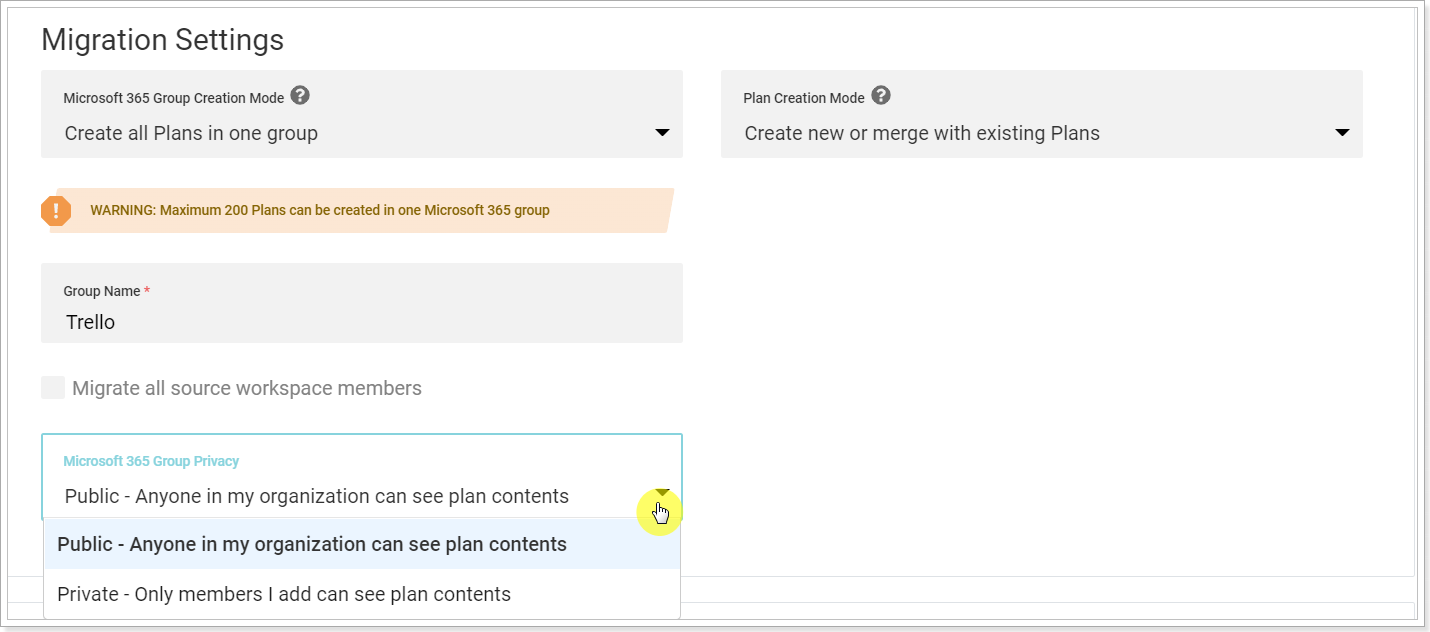
If the 'Create groups using source Workspace visibility' option is selected then created groups will have the following privacy:
- Workspace with private visibility – Private group
- Workspace with Public or Organization visibility – Public group

If the 'Create groups using source Board visibility' option is selected then created groups will have the following privacy:
- Board has private or workspace visibility – Private group
- Board has Team/Organization/Public visibility – Public group

Plan creation mode: In this section, you can select how plans should be created if there are Plans in Planner Basic with the same names as Boards in the source system.
'Create new or merge with existing ones' option allows creating new Plans or merge the data to the existing Plans with the same names as the source Boards if any.
'Create new and remove existing Planes before creating' option allows creating new Plans from scratch deleting the existing ones with the same names as the source Boards if any. In this case, existing Planner Plans with names that match selected source Board names will be removed together with all their tasks.

2. Board Field Mapping
In this section, you can review Board field mapping. The Board name corresponds to the Plan name and the List name to the Bucket name.

3. Card Field Mapping
This section is used to map the card fields from source Boards with the target Planner task fields.
In this section, you can review which field values are migrated from the source Trello system to the target Planner Basic system.
Default fields will be mapped automatically by name and compatible type once the connection to the source and target systems is established and items to migrate are selected. In case multiple source fields compatible with a target field are found by name they all are added for mapping.
It is also possible to add custom fields for the mapping. All the compatible source and target fields available for mapping are listed and can be selected in the drop-down menus in the Card Field Mapping.
You can also check the Multiple checkbox and select several fields for mapping.
If you select several source fields for mapping, you can also select the Join Values option. In this case, values from all the selected source fields will be added to the target field (for example, Notes and Description source fields can be mapped to one target field Notes, and the values from both the fields will be migrated and joined in the target field).
In case the Use First Found option is selected, the values from the first mapped item field, found in the source Board, will be migrated to the mapped target item field.
If a custom field that allows having multiple custom values (e.g. field of the Dropdown type) is selected for mapping, check the Use Custom Lookup option to map particular values of the source item field with values of the target field.
The Use Custom Lookup option is recommended to use for mapping values of such item fields as ‘Progress (Percent Complete)’ and ‘Priority’ that have a set of predefined values which may differ between the source and target systems. Existing custom field values can be selected in the field drop-down menu.
If you do not need to migrate any of the field values, you can remove such fields from the mapping.

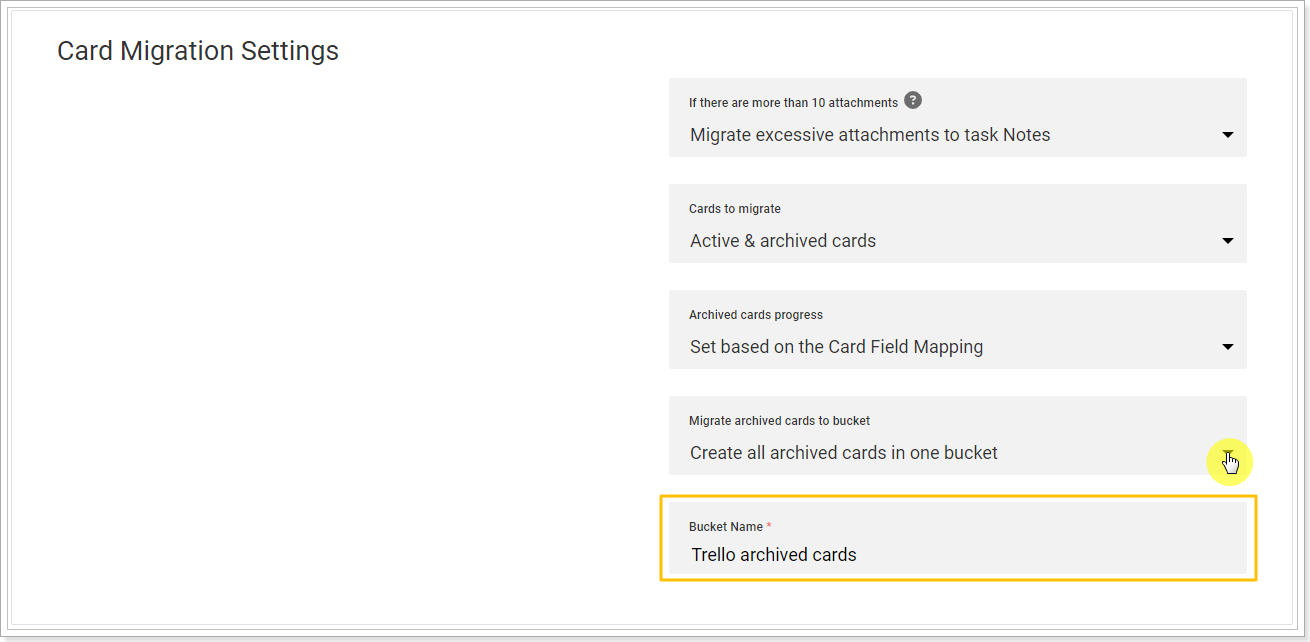
4. Card Migration Settings
Planner Basic allows adding a maximum of 10 attachments per task via API. Using the Card Migration Settings it is possible to choose how the rest of the attachments (if there are more than 10) will be added to Planner.
Migrate excessive attachments to task Notes if this option is selected, all attachments from the source will be added to the Documents -> Task Attachments folder of the Planner SharePoint Site. Ten first attachments will be added to the Planner task. For the rest of the attachments, the links to the files from the Documents folder will be added to the Notes Planner field.
Skip excessive attachments if this option is selected, all attachments from the source will be added to the Documents -> Task Attachments folder of the Planner SharePoint Site. Also, the first ten attachments will be added to the Planner task.

Cards to migrate:
Only Active (selected by default) will include only active cards in the migration.
Active&Archived will include all cards, active and archived.
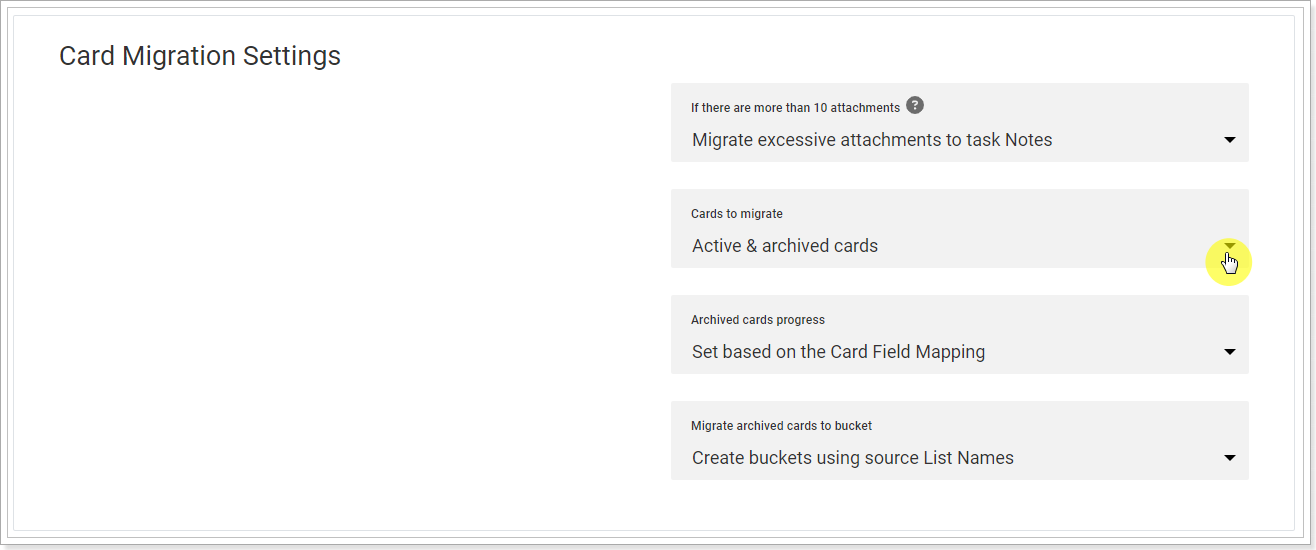
When the Active&Archived option is selected, additional settings become available:
Archived cards progress:
- Set based on Card Fields Mapping: similar to active cards, the progress for archived cards will be set based on the Card Fields Mapping settings above.
- Mark Archived Cards as Completed: this option allows you to mark all archived cards as Completed, disregarding the card's progress.
Migrate archived cards to bucket:
- Create buckets using source List Names: the archived cards will be migrated to Planner Basic, and new buckets will be created using the List names.
- Create all archived cards in one bucket (provide the bucket name below): this option allows you to create one Planner bucket and migrate all archived cards there.
Please note: All archived cards, including those archived as part of the List and separately archived ones, will be migrated to this bucket.
5. Users Mapping
This section is used to map the users from Trello to the Planner Basic system.
Please note: User mapping will include users from all Workspaces that the connection account has access to, and Board members of the Board that the connection account has access to. If the connection account is a member of a Workspace that includes Private Boards where the connection account is not added, the members of the Private Boards will not be displayed in the User Mapping section.
Please note: Due to API limitations, only usernames from Trello are available, user emails cannot be seen in the User Mapping section. The users will be automatically mapped by their names.
It is possible to map the users manually, if the users were not mapped, you can find the required user manually in the User Mapping section.
User Mapping can be exported to an Excel file. You can map the users in the Excel file if needed and upload the mapping from the Excel file to Project Migrator, User Mapping section.
Please note: The users cannot be migrated from Trello to the target Planner Basic tenant. User accounts should already exist on the target environment (in the Entra ID (formerly Azure AD) of your Planner Basic tenant) before the migration starts. In this case Project Migrator will find the required users by their names and will map them automatically to migrate the assignments and other resources data to the target Planner environment.
If there is no corresponding account on the target system (Planner Basic), then the line with such a user will be highlighted in red and will have 'Not Mapped' status. Such users will not be taken for migration.
If there is incomplete correspondence for some of the users (for example, the email is the same but different user names), they will have the ‘Partial Match’ status and will be marked with yellow color. Pay attention to such lines and correct the mapping if needed.
If there is complete correspondence found, such users will be marked with green color with the 'Match' status.
You can review the mapping summary at the top of the section.

Step 4 - Launching the migration process
When you complete all steps: set up the connection between source and target, select data for migration, perform mapping you can launch the migration process.
Please note: Planner Basic sends notifications to all group members about comments, assignments, and when users are added to groups. Because of this, users may receive numerous notifications during data migration to Planner Basic. Please refer to this article to disable them before the migration starts: How to turn off email notifications sent during migrations to Planner Basic.
To launch the migration process click on the 'Proceed' button under the 'User Mapping' section.

Migration Summary window will be opened. Review the information in the Migration Information section and click the 'Start Migration' button to launch the migration process.

Please note: If you have not purchased any subscription plan yet, a free plan (for 2 projects) will be applied. If you have exceeded the limit of projects that you can select for migration according to your subscription plan (free or paid one) and did not upgrade your plan while selecting the projects, you will see the 'Proceed to Checkout' button instead of the 'Start Migration' one. You can upgrade your plan by clicking on this button and then launch the migration process.
Data Migration Summary window will be opened displaying the Summary Information and the progress for the migrated groups and Boards as well as Migration Settings and Mapping.
You can close this window.
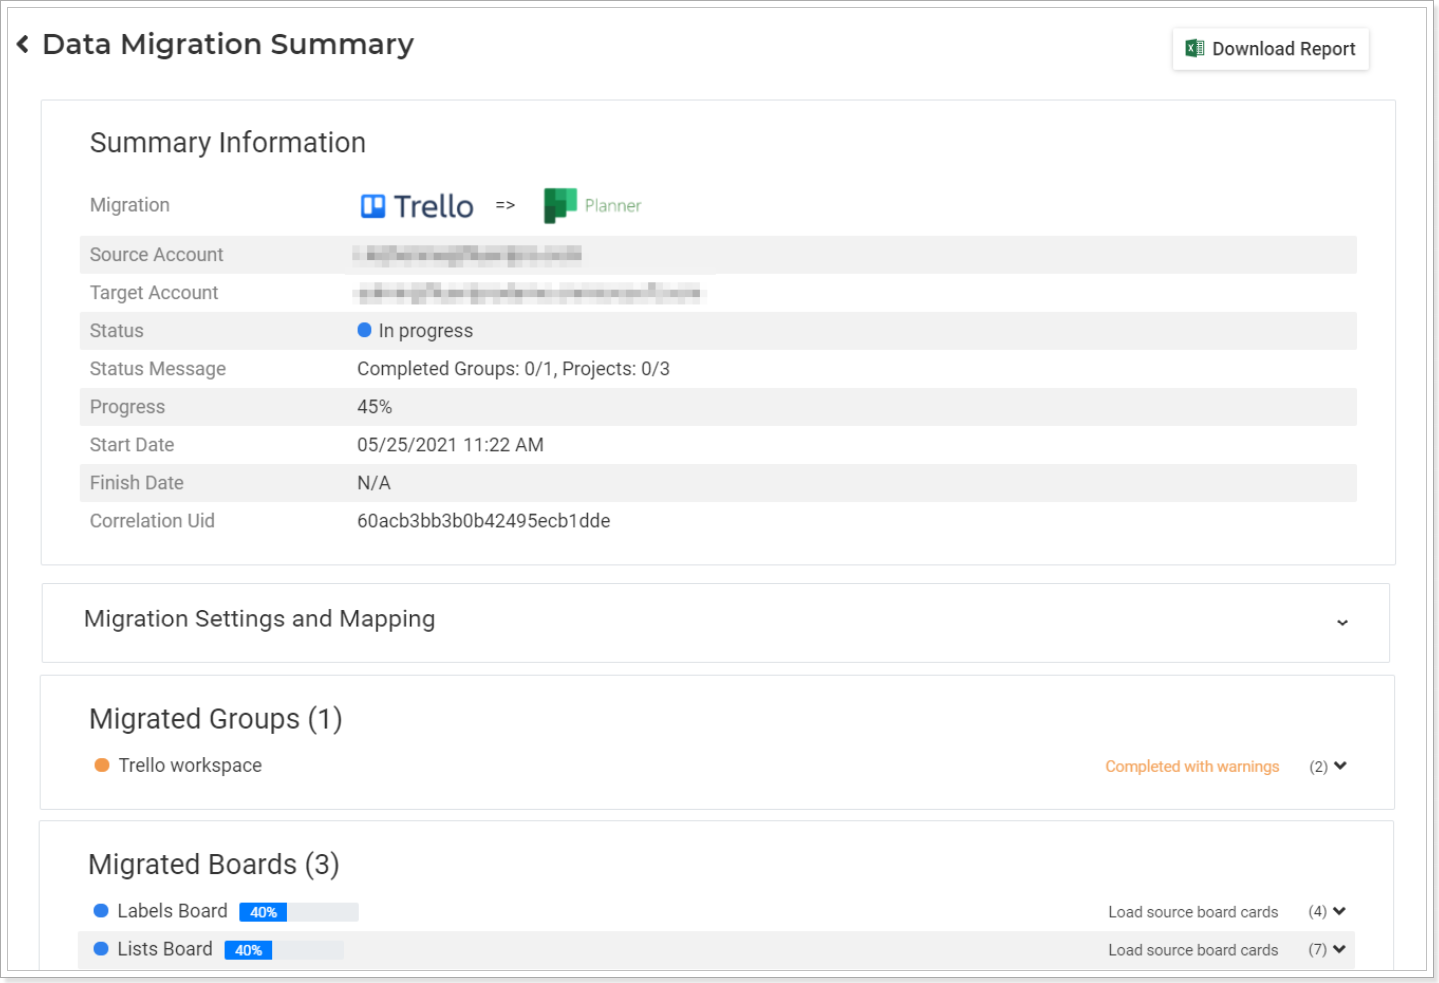 The operation details will appear on the Home Page at once in the Migration History section. You can track the migration status here as well.
You can always click on the migration to open the Migration Summary page and review the details for your migration. Also, the migrated boards can be opened and reviewed in the Planner Basic system from the Migration summary page.

