
Start creating the integration scenario
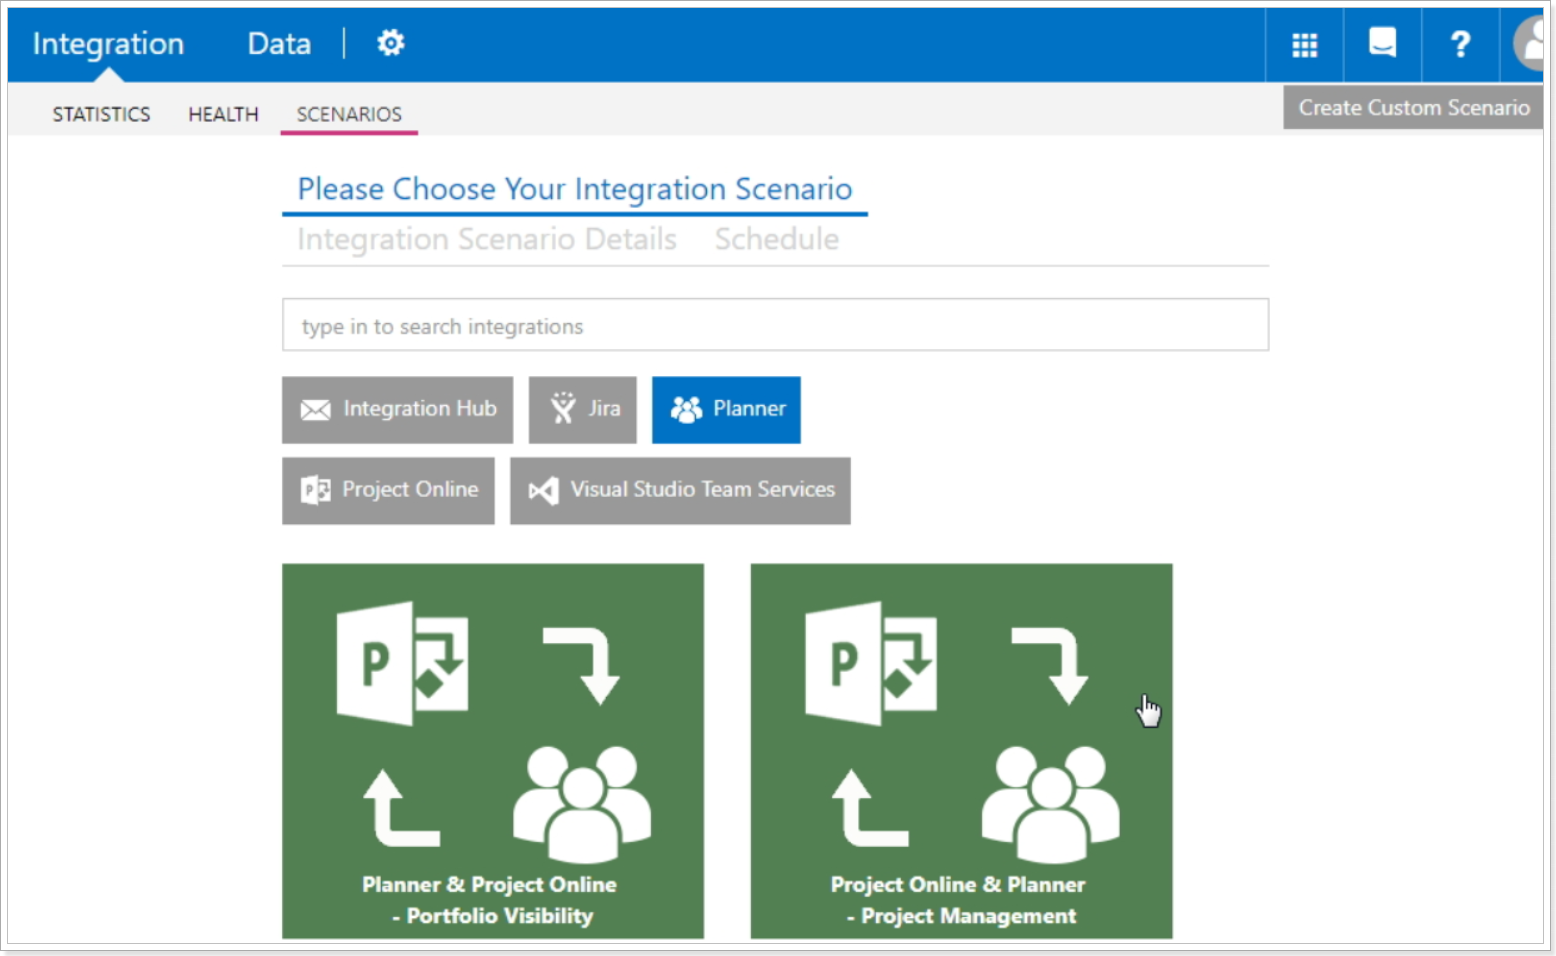
1. As you installed Integration Hub application, the first step will be to create a new integration scenario. Navigate to the Scenarios tab and click New Integration button.

2. Click on the Planner box to narrow your search and choose Project Online & Planner - Project Management Scenario.
Create connection to Project Online
3. In the Connection field click New and provide the URL of the Project Online PWA you would like to establish a connection to. Alternatively, select an existing URL from the drop-down list.
In Project Online connection there are three authentication options:
-
OAuth
The 'OAuth' authentication type is a standard and preferred option. When it is used, Integration Hub is authorized to access your resources without sharing credentials. The access token is issued to the Integration Hub app by the authorization server, with approval from your side. Integration Hub then uses the access token to access and process your Project Online data and stores the refresh token for continuous integration.
Please note: If you are creating the first Integration Scenario in your Integration Hub tenant and choosing the OAuth authentication type, there might be a problem with the connection to Project Online. If a problem occurs, as a workaround, we recommend creating the first scenario using SharePoint credentials. When the first scenario is created, later on, you can change the authentication type of this scenario for the OAuth authentication type as well, if required. -
SharePoint Online credentials
If the ‘SharePoint Online credentials’ authentication type is selected a connection will be set up via login and password to a connected SharePoint account. In this case, the credentials are stored and protected in the Integration Hub app. Login to the PWA and please make sure that the account used for running integrations has the necessary set of permissions. -
SharePoint On-premise credentials
This type is used for Project Server 2019 and is available for Integration Hub on-premises version only. If this type is selected a connection will be set up via login and password to a connected SharePoint account. In this case, the credentials are stored and protected in the Integration Hub app. Login to the PWA and please make sure that the account used for running integrations has the necessary set of permissions.
Please note: The Project Server you add as a URL in the login field should be within the same domain as the virtual machine where Integration Hub on-premises is installed.
Login to the PWA and please make sure that the account used for running integrations has the necessary set of permissions as described in this article.

Setup Project Online for integration
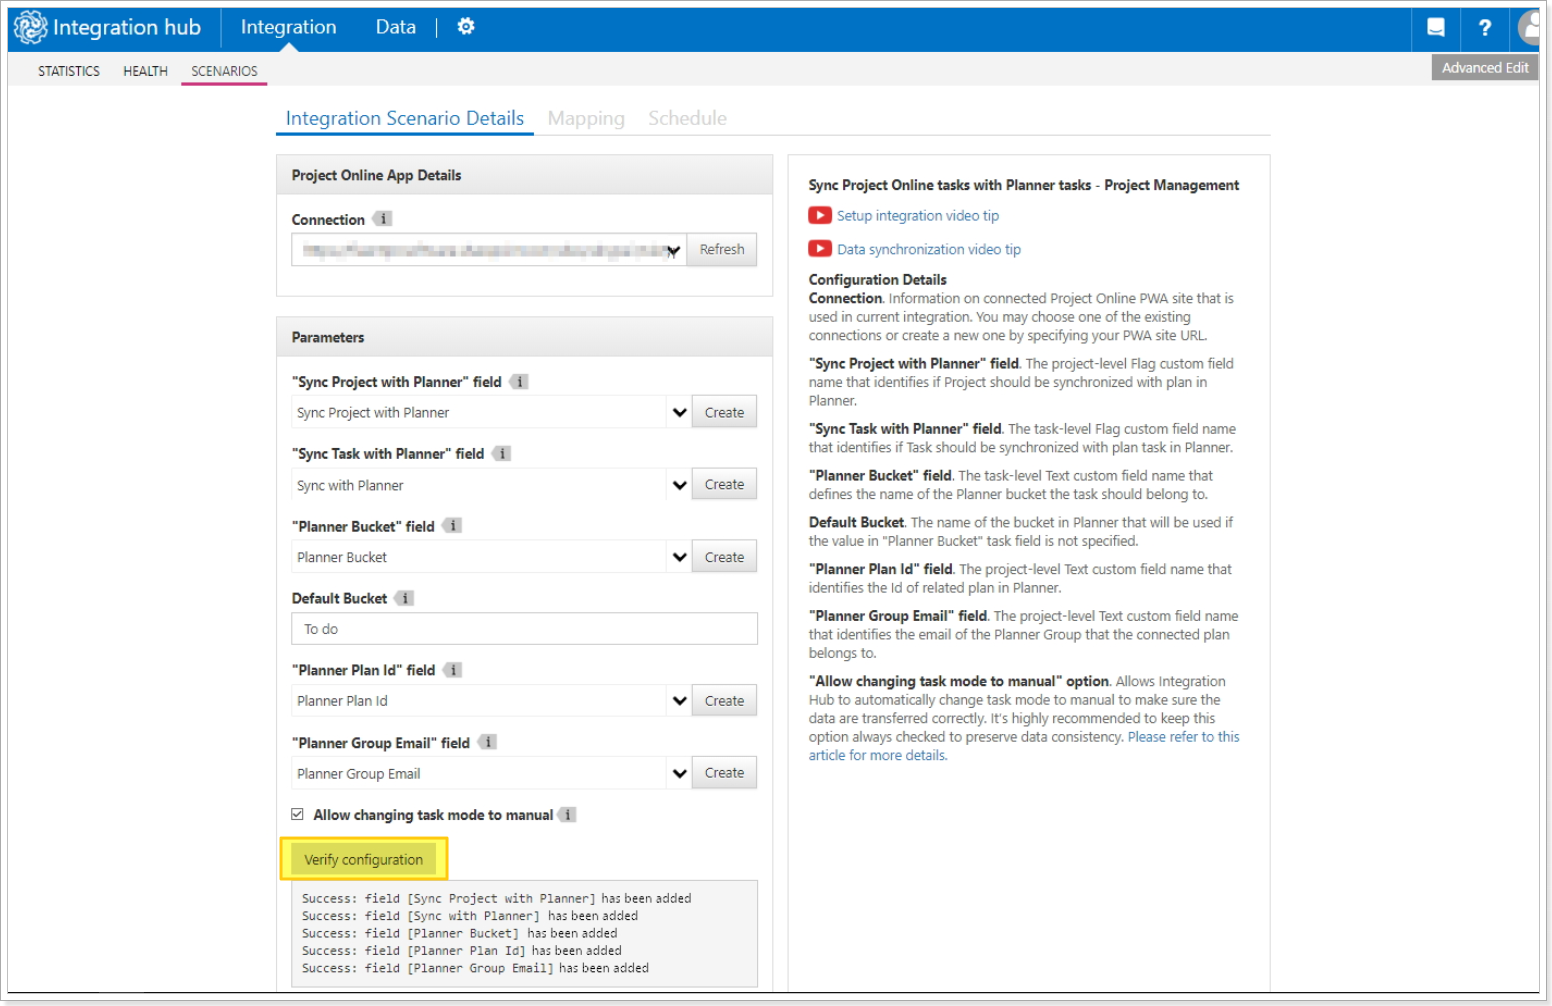
4. You need to create the necessary custom fields on the PWA. This can be done in the following ways:
- Click the 'Create fields' button. All fields listed under Parameters will be created in the defined PWA.
- Create custom fields listed under Parameters manually on your PWA. Please note, that the names should fully correspond to the ones listed under Parameters.
Please note: If you have previously created configuration before 11/15/2017, please navigate to your PWA and remove the existing fields to avoid duplicates. After deletion please proceed with new configuration creation.

5. Click the 'Verify Configuration' button to check if all fields have been created successfully.
Please note: 'Allow changing task mode to manual' option allows Integration Hub to automatically change task mode to manual to make sure the data are transferred correctly. It’s highly recommended to keep this field always checked to preserve data consistency.
If this option is unchecked, the tasks in Project Online set to auto mode will remain as is. In some cases, this may prevent Integration Hub from correctly transferring the data.
Please note: Master Projects are not supported for integrations.
Click Next to proceed.
Create connection to Planner
6. Provide a Planner account to establish the Planner connection. Click New and sign in to Planner with this account in the appearing window. Authorize Access to Planner by clicking Accept button.
Please note: Integration Hub supports the former version of Microsoft Planner and the new Planner (basic plans). This includes all basic templates:
- Simple Plan
- Project Management Basic (without a diamond)
- Business Plan Basic (without a diamond)
- Employee Onboarding Basic (without a diamond)
Please note: Planner account used for integration should have access to the required Planner Groups (the ones involved in the integration) and be a member of the Plans selected for synchronization.
7. Select the options as required:
- Push new plan tasks to Project Online: If checked, tasks created in Planner will be pushed and synchronized with project tasks in Project Online.
- Push task dates to Project Online: If checked, the Start and Due dates of tasks in Planner will be pushed to Project Online.
-
Use task labels as progress markers: If checked, task labels will be used to determine task progress Namely: Pink: 0%, Red: 25%, Yellow: 50%, Green: 75%, Blue: 90%, Purple: 100%.
(If this option is selected, Labels will be synchronized to Project Online as Project Progress instead of the Progress Planner field. If this option is not selected, Planner Progress field will be synchronized to Project Online Project Progress).
Then click Next to proceed.

Review Project Online & Planner fields mapping
8. On the Fields Mapping wizard screen you can review default mapping rules. Click Next to proceed.

Integration schedule configuration
9. On the wizard screen the integration link schedule can be configured. There are two options of the integration starting available:
- On-demand - means that integration will be started only manually by clicking on the 'Run Now' button.
- By schedule - means that integration will be started automatically according to the configured rule daily or weekly.
The Synchronization Start Date option allows specifying the timestamp to be used as a start date for polling data. By default, the current date and time are set as the Synchronization start date. So, the tasks that were modified before the current date will not be included in data synchronization, only the new tasks created after this date and the tasks that were modified after this date will be included in data synchronization. If you would like to synchronize tasks that were modified prior to the current date, it is required to set the date in the past (the tasks that were modified for the period of time starting from this date will be taken for synchronization).
Please note: The Synchronization Start Date field can be set up only during the synchronization scenario creation. When the scenario was created, it will not be possible to change this date. If you need to change this setting after the scenario was created, it is required to archive a previous scenario and create a new one to set this setting as required during scenario creation.
Also, this setting works for Project Online tasks only. Integration Hub can synchronize only newly created Planner Plan tasks after the first data synchronization or the ones that were synchronized from Project Online and updated in Planner.
Please note: If you select the 'By schedule' option for a two-way scenario, it is important not to set two integrations to start simultaneously. It is important to set them so that the second integration is launched after some period of time after the start of the first one.
For example, integrations from Project Online to Planner will be performed every hour, and integrations from Planner to Project Online every hour and a half.
If you set the synchronization time while configuring the scenarios, the time set in the wizard (as on the example below) will be applied to both directions at once. The best practice will be to set the time for synchronization for both directions separately after the scenario configuration is over.
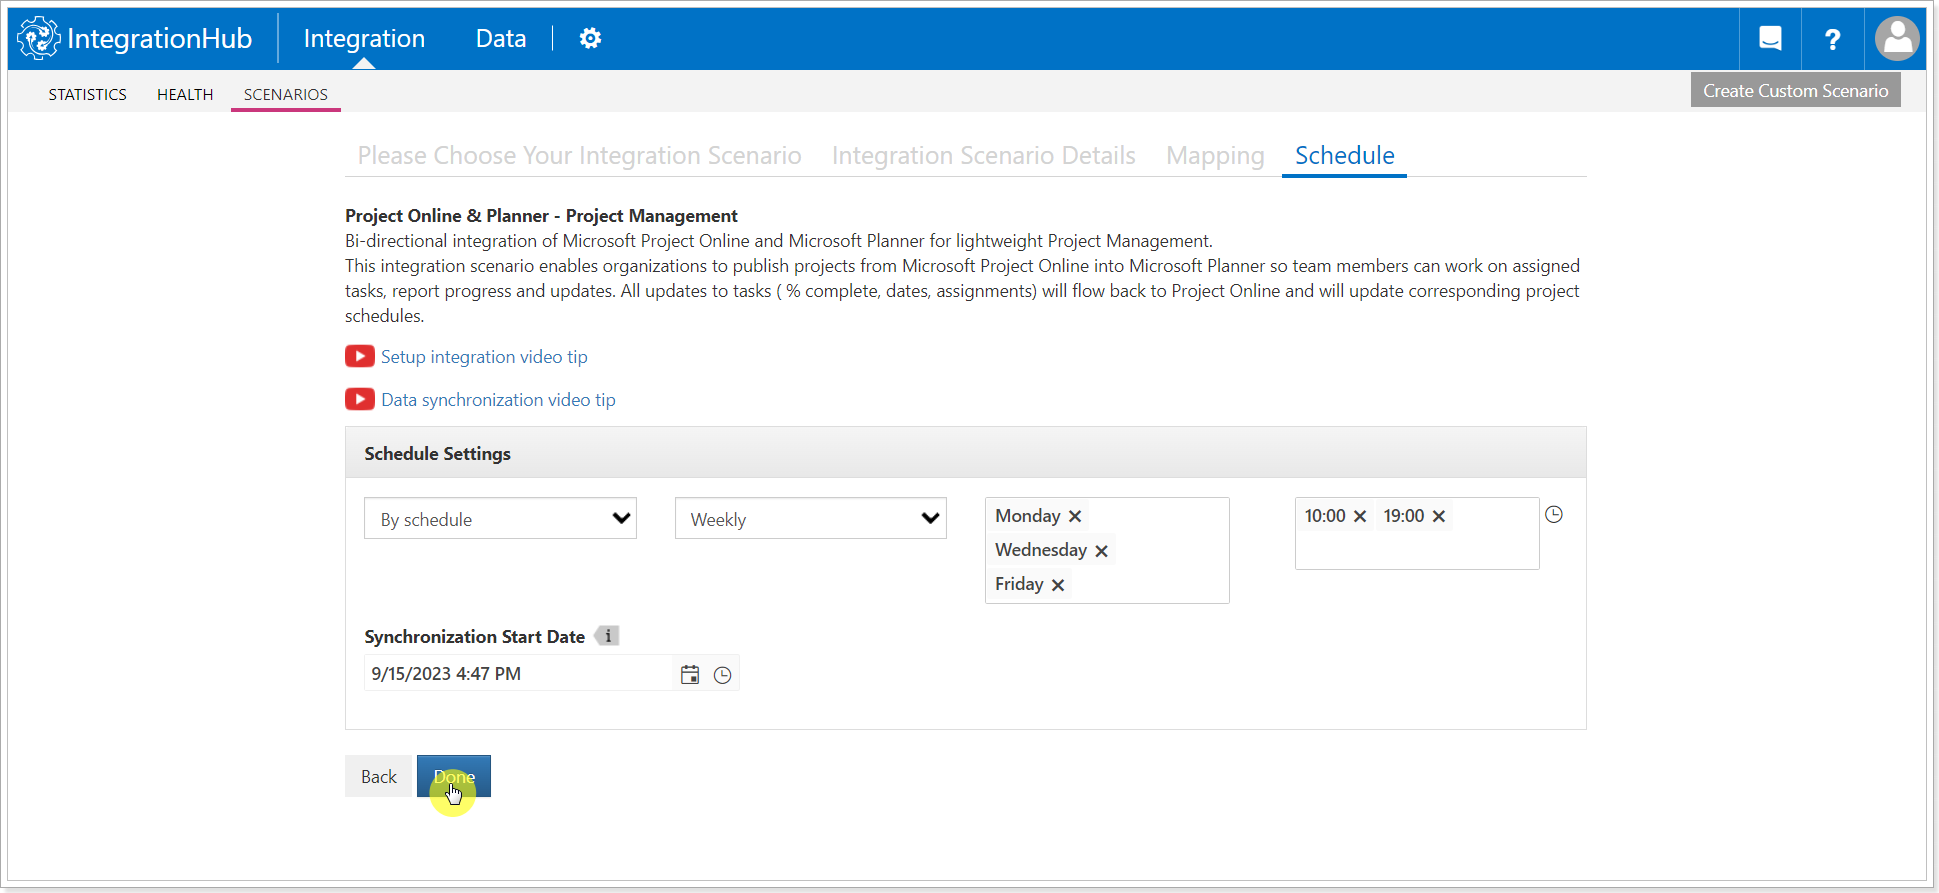
10. Click Done. The configuration is completed and you will be redirected to the Scenarios page.
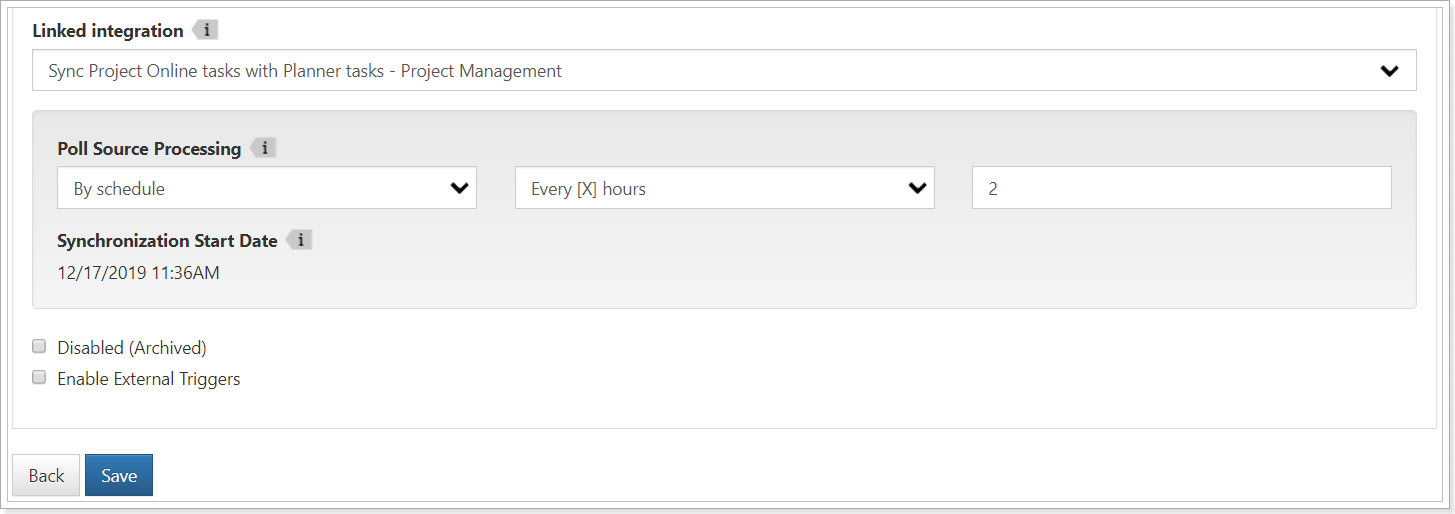
11. The next step will be to set the time for synchronization for both directions separately. For this purpose, navigate to the required scenario and open the first direction (for example Project Online-Planner) for editing.

12. Select the Advanced Edit option.

13. Scroll down to the Poll Source Processing section and select the 'By schedule' option.
Set the schedule as required. Click Save to save the changes.

14. Open the second direction of the same scenario (Planner-Project Online) for editing.

15. Select the Advanced Edit option.

16. Scroll down to the Poll Source Processing section and select the 'By schedule' option.
Set the schedule so that it does not coincide with the previous direction schedule. (For example, integrations from Project Online to Planner will be performed every hour, and integrations from Planner to Project Online every two hours).
Click Save to save the changes.
You have successfully configured the integration scenario! The next step will be to configure your PWA following the steps described in the Configure Project Online article.