
Installation prerequisites
1. The Audit Manager Report Pack is intended to work with Audit Manager. Thus, in the following instruction we assume, that you have already configured data synchronization between EPM Pulse and your Project Online instance and you have configured Audit Manager reporting.
2. Power BI reports provided by FluentPro use EPM Pulse OData as a data source. To establish a connection between Power BI and EPM Pulse OData Basic authentication is required - login and password of a user who has access to EPM Pulse and is an EPM Pulse Admin. If you used either of the integrated authorization modes - Office 365, Google or Microsoft - when signing up to EPM Pulse or if you installed the EPM Pulse application from SharePoint Store, it would not be possible to establish a connection between Power BI and EPM Pulse OData. For such authentications user's login and password are not used explicitly. They use access tokens instead. User account used for Power BI authorization should be managed via individual invitation and should have EPM Pulse Admin level permissions.
Installation
1. Download Microsoft Power BI Desktop and FluentPro Power BI report for Audit Manager.
2. Start and Sign In to the Power BI Desktop.
3. Click File > Open.
4. Use the file extension drop-down in the bottom right corner of the window to choose Power BI template files (*.pbit) file type. Navigate to the folder where you have downloaded the Report Pack template file and click Open.

5. In the menu which appears, enter the URL of your EPM Pulse tenant and add " /_odata/Connection Name"
(e.g. https://us-online.epmpulse.com/@demo/_odata/Project Online ).
Time Zone parameter allows entering a time zone manually before extracting the data to the Power BI template. This parameter allows displaying date-time values in the required time zone.
The Format of the value should be +/-03:00. This value will be used to convert each date-value in your report.
Click Load.
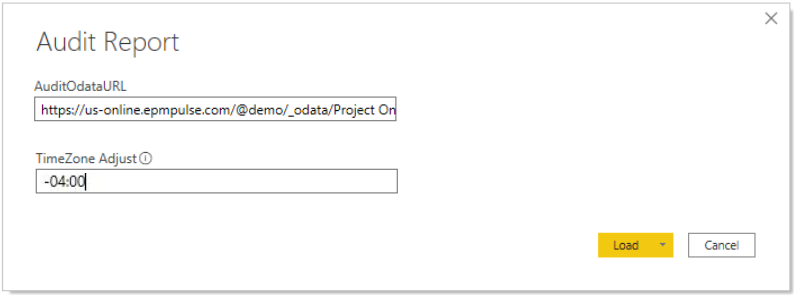
Please note - Connection name can be found in the Data Management section of EPM Pulse (under Gear Button).

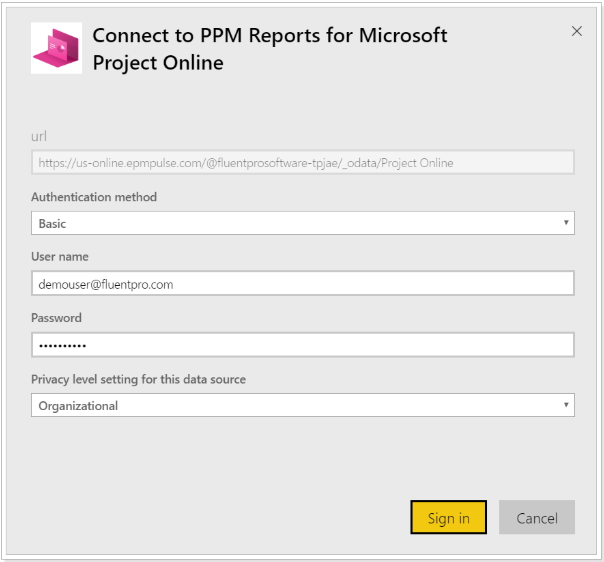
6. In the connection credentials menu which appears, choose Basic.
Use the Account and Password that have access to EPM Pulse and EPM Pulse Admin permission. Choose the URL which ends with /_odata/ConnectionName. in the Select which level to apply these settings to drop-down.
Click Connect to proceed.

- In Power BI Desktop, click on Edit Queries > Data source settings.
- Choose the invalid credentials in the list and click on Clear permissions button.
7. Wait until Power BI downloads data into the report. This may take some time depending on how much data it needs to load.
9. To make this report available online, save it to your machine. Then publish it to the Power BI online workspace of your choice (File > Publish > Publish to Power BI).
As soon your report is published, you will need to navigate to the Power BI application site and check Dataset settings to make sure your report will be updated. More details can be found in the following article - Making sure report data will be refreshed.
'(404) Not found' error when trying to load data to report
Following the steps to create a report in Power BI desktop using FluentPro Power BI package user receives an error '(404) Not Found'.
Such error may occur on the step when a user chooses an OData feed as a data source, provides the User Name and Password for authentication, and clicks 'Connect':

Power Bi Desktop will attempt to load the data, connecting to the provided OData feed URL with the provided credentials.
Instead of the data being loaded, the user receives an error:

The error message most frequently occurs due to the provided user account credentials not being valid.
Power BI reports built with the help of FluentPro Power BI packages use EPM Pulse OData as data source. In other words, Power BI extracts data from EPM Pulse OData and loads it to the report. To establish a connection between Power BI and EPM Pulse OData Basic type of authentication is required - login and password.
If either of integrated authorization modes were used - Office 365, Google, or Microsoft - when signing up to EPM Pulse, it would not be possible to establish a connection between Power BI and EPM Pulse OData since for such authentications user's login and password are not used explicitly. They use access tokens instead.
Solution 1: Generate a password for your account in EPM Pulse
If you signed up to EPM Pulse using either of the integrated authorization modes - Office 365, Google or Microsoft, you can still use your user account, however, you would need to set a password for this account in EPM Pulse:
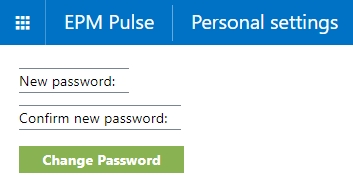
1. Navigate to EPM Pulse and click on your account in the top right corner of the screen. Then choose Personal Settings:
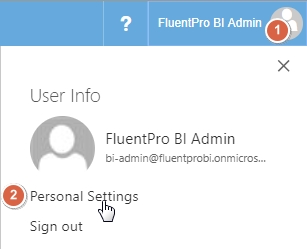
2. In the opened page choose the Change your password option.
This option only allows to create or update a password for access to EPM Pulse. The Office365 password will NOT be changed
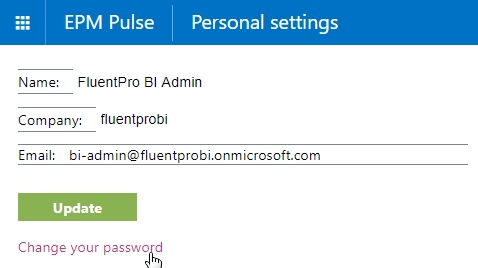
3. In the opened page type in the password you would like to use to the New password field and repeat the same password in the Confirm new password field.
Then click Change Password.
4. You can now use your user name and the freshly generated password to connect to the EPM Pulse OData feed in Power BI.
Solution 2: Add user to your EPM Pulse via Individual Invitation
In EPM Pulse it is also possible to add a user via individual invitation.
Such a user would also need to generate a password to log in to EPM Pulse. Thus, it would be possible to use such a user account for the connection to the EPM Pulse OData feed in Power BI.
Follow the step below to do that:
1. Navigate to EPM Pulse. Click on the gear-like button and choose the User Management option -

2. In the User Management page scroll down to the Invite more users section.
Type in the email address where the invitation will be sent. This can be any email address - personal or work.
Make sure to select the Admin option in the Role drop-down!
Then click Send Invitation.

3. EPM Pulse will send an invitation to the specified email address.
Open the invitation and follow the link in the email body to proceed.

4. EPM Pulse will be opened in the new tab. Click on the account name in the top right corner of the screen.
Choose Personal settings and update the password following these steps - Generate password for the account in EPM Pulse.