
In the integration scenario "Project Online <> Planner (Two-way integration with project stages)" the mapping of project tasks and Planner Plans, and initial integration should always be performed from Project Online.
I. Project Online project configuration
Please note that in this integration scenario not Project Online projects are mapped with Planner Plans, but project tasks of different level with Plans.
You can map tasks of any level (tasks or sub-tasks) for integration, but each of them will be synchronized either as a new Planner Plan or will be integrated with an existing Plan in Planner.
As an example, we will use a Project Online sample project named Staged project. Note that the task view was already configured as explained in Part 3 of this guide.

This project has three main tasks considered as project stages, for which the Map To Plan field is set to Yes.
Important note: By default, each project in Project Online has a Project Summary task always named equally to the name of your project. Please keep in mind, that Project Summary Task can't be synchronized using this scenario and shouldn't be mapped for integration (the Map to Plan custom field for Project Summary Task should be always set to No).
For the Stage 1 task we also have one sub-task (Substage 1.1) which we also want to consider as a stage, hence the Map To Plan field for this sub-task is also set to Yes.
The Stage 2 task has two sub-tasks which we don't want to link to Planner, so we can set the Map To Plan field to No or just leave it empty.
Note, that the Planner Task Plan Id and Planner Task Group Email fields are left empty for all the mapped tasks. This will result in creation of new Plans in Planner for each mapped task.
Also, the field Planner Task Plan Name is only automatically populated during the integration from Planner.
If you'd like to link one of the tasks with an existing Plan, you need to fill in either the Planner Task Plan Id or Planner Task Group Email field for this task.
Save and publish the project to move to our integration scenarios we created previously.
II. Launching integration of Project Online project to Planner
Open Integration Hub and navigate to Integration > Scenarios.
On the first run we need to launch the Sync Project Online project structure with Planner artifacts scenario (e.g. Project Online > Planner direction).
Click on the down arrow icon (1) next to this scenario and select Run now. Allow Integration Hub some time to perform the requested action.
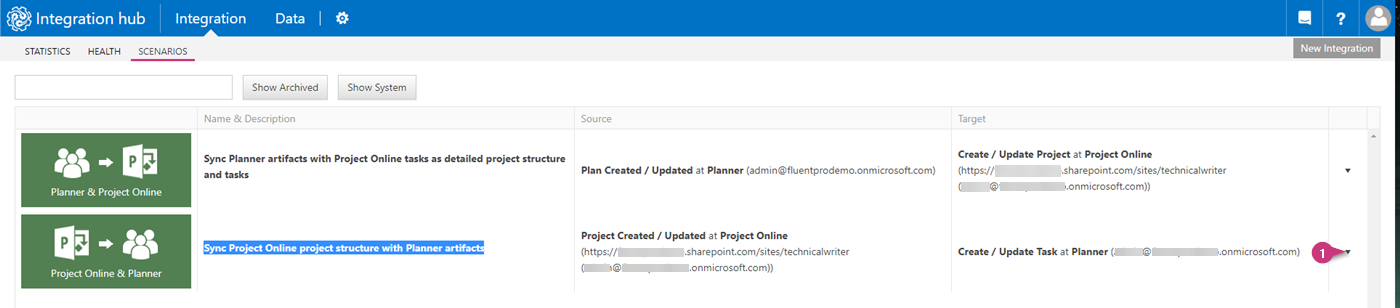
As soon as the integration scenario completed its run, you will see new Plans created automatically in Planner:
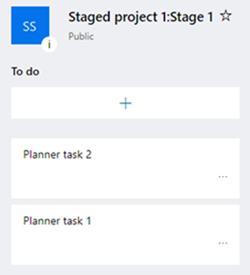
- Staged project 1:Stage 1
- Staged project 1.1:Substage1.1
- Staged project 2:Stage 2
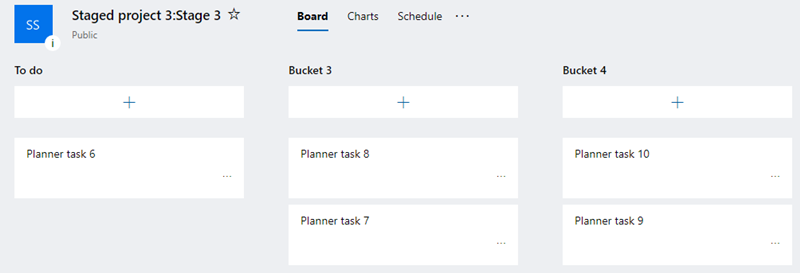
- Staged project 3:Stage 3
Since previously the Include Project Name and Task WBS to Plan Name option was enabled in our integration scenario, the naming of these plans follows the formula:
<Project name> <Project Online Task WBS>:<Task name>
Please note: Tasks of the second level or their sub-tasks marked for integration will not be transferred to Planner as buckets or Planner tasks. This integration scenario is not designed to create buckets and tasks in Planner Plans based on the project task hierarchy during the integration from Project Online.
Thus, during the integration from Project Online to Planner new Plans will be created and the existing Plans will be linked to the mapped tasks.
III. Making changes to Planner Plan and reverse integration
Now we will make some changes (create new tasks and buckets) to the Plans created in Planner previously and run the backward synchronization scenario to see how these changes will be transferred to Project Online:

Open Integration Hub again and navigate to Integration > Scenarios.
At this point we need to run the integration scenario in Planner > Project Online direction, so we run the Sync Planner artifacts with Project Online tasks as detailed project structure and tasks scenario.

As soon as the data transfer is finished, you will be able to see how the changes have been transferred to Project Online:

- The buckets with tasks have been transferred as a set of tasks and sub-tasks corresponding the initial hierarchy in Planner:
- Planner Plans correspond to the mapped tasks (stages) of the first level that become Summary tasks;
- Plan buckets get created as tasks of the second level below the corresponding Summary tasks;
- Plan tasks are created as sub-tasks to the ones created out of buckets.
- The fields Planner Task Plan Id, Planner Task Group Email and Planner Task Plan Name have been automatically filled in.
Usage limitations
1. Do not map the Project Summary task for integration
By default, each project in Project Online has a Project Summary task always named equally to the name of your project. Please keep in mind, that Project Summary Task can't be synchronized using this scenario and should not be mapped for integration (the Map to Plan custom field for Project Summary Task should be always set to No).
2. Do not map the tasks brought from Planner for integration
Setting the Map to Plan field to Yes makes Integration Hub consider this task or sub-task as a stage and, as a result, a new plan in Planner is automatically created. This may quickly mess the task hierarchy in your project.
3. Synchronizing new tasks from Project Online to Planner
New tasks or sub-tasks created in the hierarchy of the task mapped with a Plan will not be transferred from the Project Online project to Planner, unless their Map to Plan field is set to Yes. Only updates on the tasks synchronized with Planner will be transferred to the mapped Plans.
4. Integration should be unique
Each specific Planner plan can be mapped only to one task in Project Online. Mapping the same plan to more than one task is not supported. If two or more tasks are mapped with the same Plan, all of them will be skipped and will not be updated during the integration.
5. Tasks mode
All tasks synchronized from Planner will be set to "Manually scheduled" task mode.