The process of embedding an EPM Pulse dashboard in a PWA page in a few words is as follows:
- Get the Dashboard ID of the dashboard you want to embed on a PWA page.
- Open the corresponding PWA or Project Site page for editing.
- Add the Content Editor web part to the page.
- Paste the script with the source dashboard data into the web part’s HTML Source window and stop editing the page.
Each of these steps is described in more details in the next chapters of the article.
Limitations
There are certain limitations, that should be taken into consideration:
- Dashboard must be public. Private Dashboards cannot be embedded.
- User who is accessing PWA/Project Site, should have at least EPM Pulse Viewer permission in order to be able to view the embedded Dashboard.
- While embedding Project or Resource dashboard it is strongly recommended to set Project Filter for this dashboard to display all projects or at least the projects that you are planning to browse. In case you filter out certain projects and try to browse the embedded dashboard on the PDP of those projects, the embedded dashboard will show no data.
Get Dashboard PWA embed code
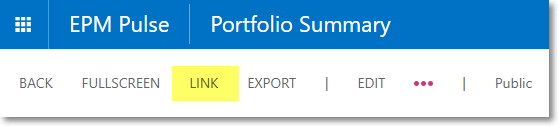
1. Go to the EPM Pulse app and open a dashboard you would like to embed in a PWA or Project Site.
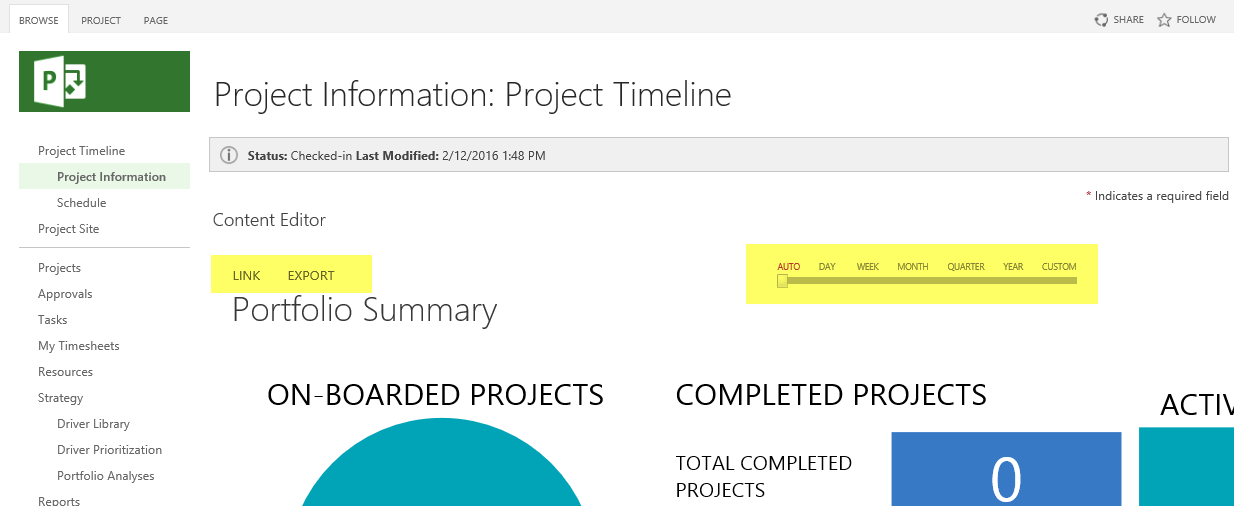
2. Click the Link option here:
Then place the mouse cursor into the PWA embed code field and click Copy, to copy the code to clipboard.
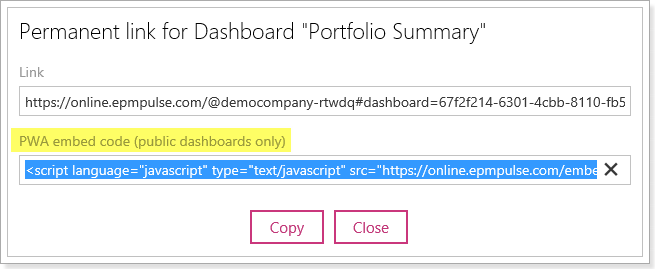
3. Paste the Dashboard PWA embed code into a plain text editor, you will need it later when setting up the Content Editor web part.

Embed an EPM Pulse Dashboard using Content Editor
1. Go to the PWA or Project Site page in which you want to embed an EPM Pulse dashboard.
2. Click on the Page tab on the Ribbon and then click the Edit Page option.

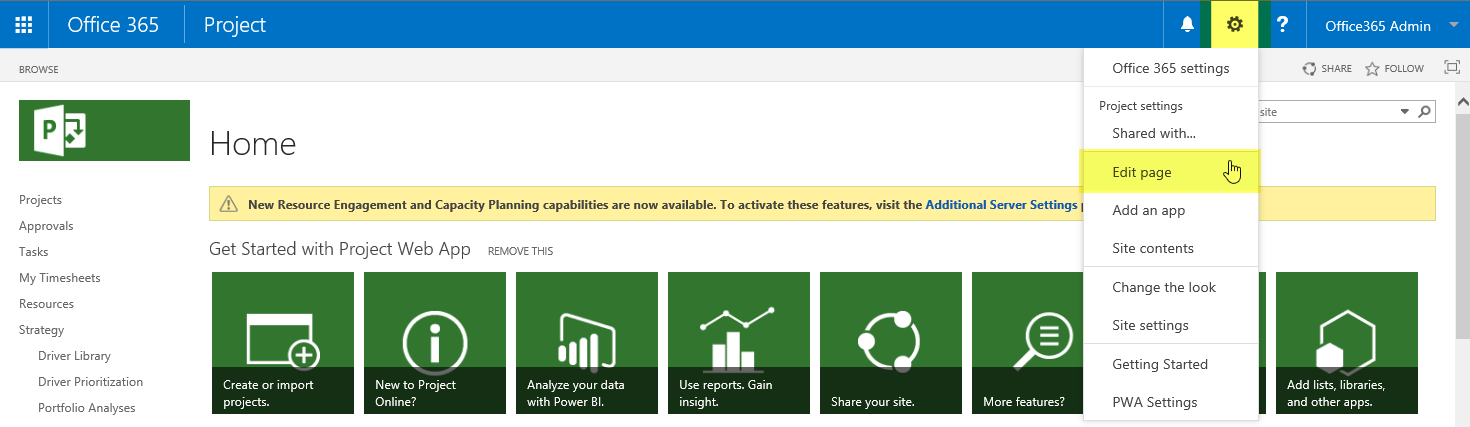
Alternatively, if the Page tab is not available on the Ribbon, select the Edit page option from the Gear menu:
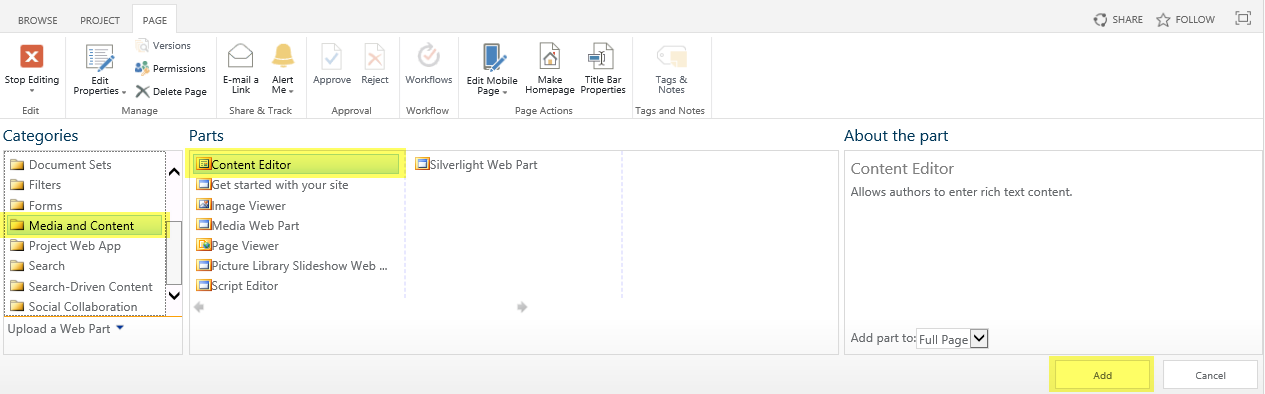
3. Click the Add a Web Part option on the page, to add a new web part.

4. Select Media and Content in the Categories list, in the Parts list select the Content Editor part and click Add to add this web part to the page.
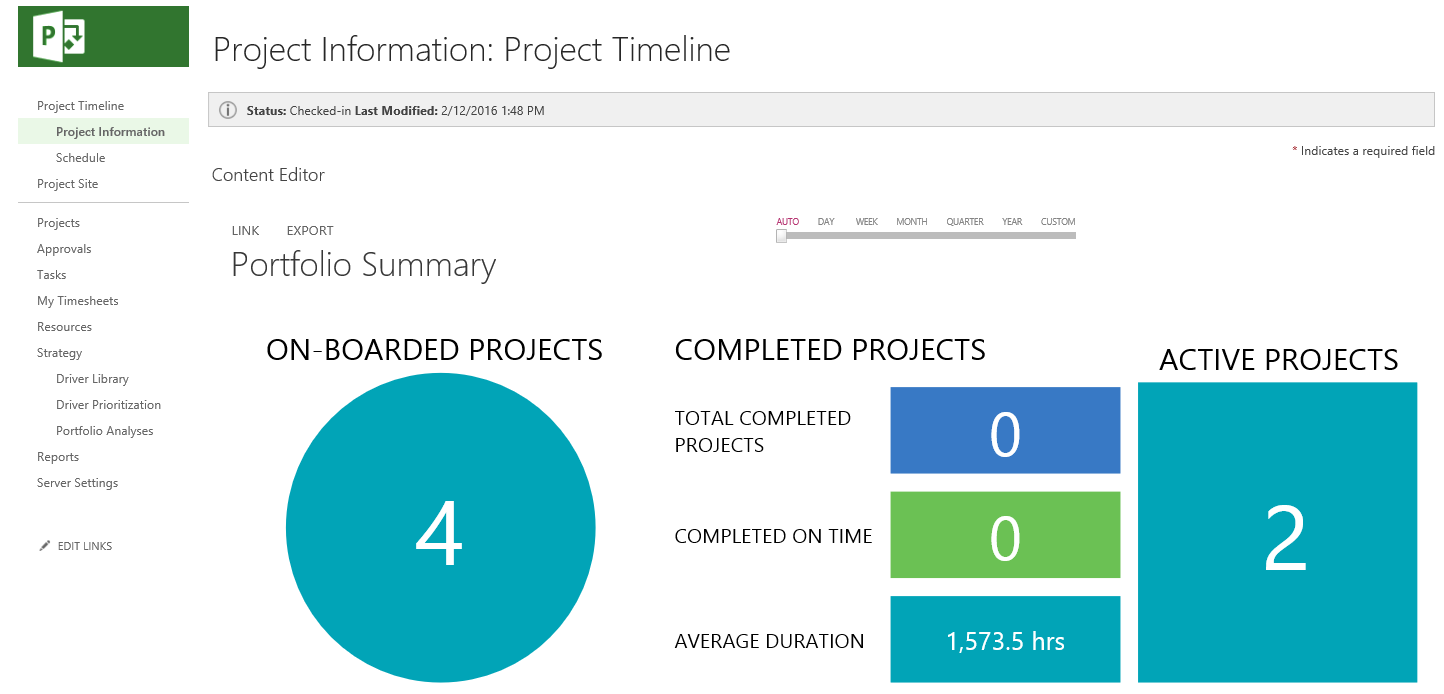
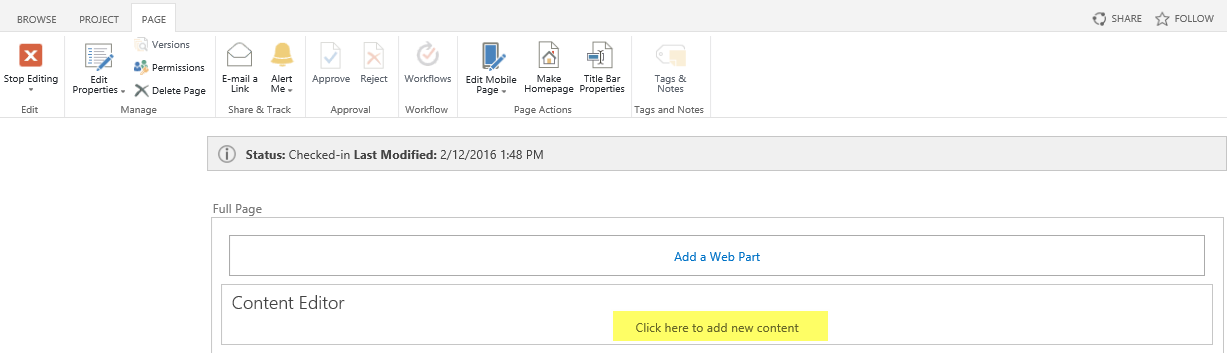
5. Content Editor web part is now added to the page, click the Click here to add new content link, to set up the web part to display the dashboard information.
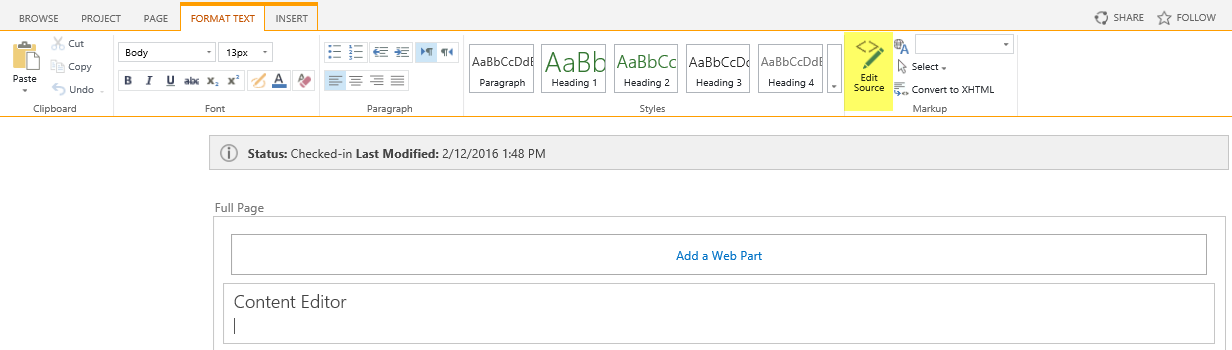
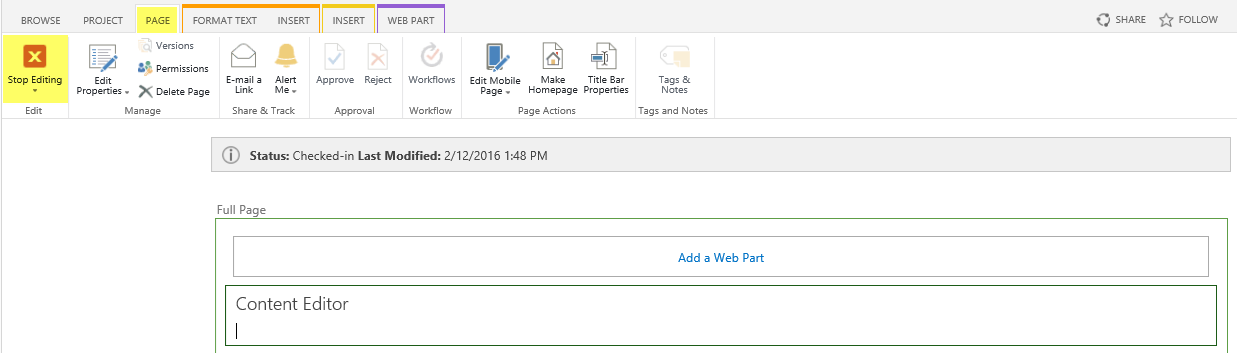
6. Click the Edit Source option on the Ribbon, to open the HTML Source window.
7. Paste the PWA embed code (the one copied from the Dashboard page in EPM Pulse) into the HTML Source window:
<script language="javascript" type="text/javascript"
src="https://online.epmpulse.com/embed?dashboardId=42c5ee97-4837-4c5f-812f-d067fa643d5d">
</script>

Besides the dashboardId parameter, which is a mandatory parameter for the embed code, the following optional parameters are also supported:
projectUid – this parameter is of GUID type and by default (i.e. if not specified in the embed code) will be read either from the ProjUid page URL parameter or from the Project Site properties or from the Dashboard properties.
If you need the dashboard to refer to any other project rather than the one associated with the ProjUid from the page URL, you can add the projectUid parameter to the embed code and specify the Uid of the project you want the storyboard to refer to, for example:
<script language="javascript" type="text/javascript"
src="https://online.epmpulse.com/embed?dashboardId=42c5ee97-4837-4c5f-812f-d067fa643d5d&projectUid=df6fc545-3d81-4c6d-ad52-dda6d21d3160">
</script>

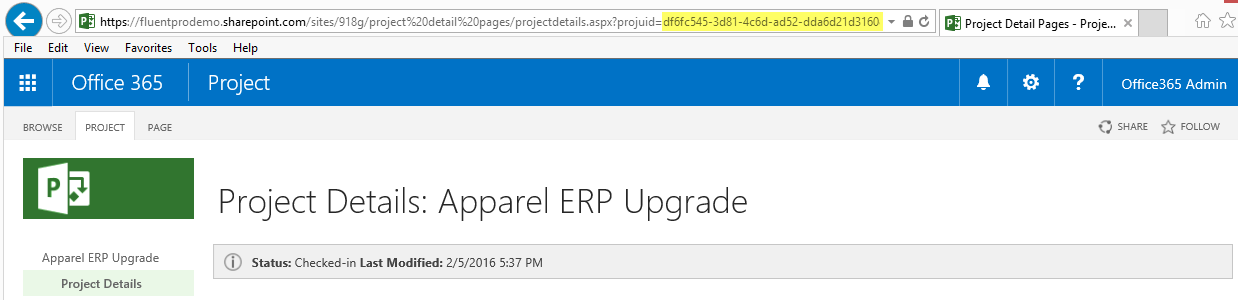
Please note: In order to get the project Uid, open the corresponding project from the Project Center and copy the set of symbols right after ?projuid= , as displayed on the image below:
showHeader – this parameter is of Boolean type and is set to false by default.
When set to true, showHeader displays dashboard action options - Link and Export, as well as dashboard timeline in the embedded dashboard. Project selector will also be displayed for Portfolio and Project dashboards, if project is not defined.
Below is the example of embed code with the showHeader parameter set to true:
<script language="javascript" type="text/javascript"
src="https://online.epmpulse.com/embed?dashboardId=42c5ee97-4837-4c5f-812f-d067fa643d5d&showHeader=true">
</script>

Embedded dashboard will appear as follows when showHeader parameter is set to true:
appInstanceId – this parameter is of GUID type and by default will be read from the PWA site.
However, if the dashboard displays the “Unable to obtain EPM Pulse App instance ID” error message, you can add the appInstanceId parameter to the embed code and specify the Instance Id of EPM Pulse App, for example:
<script language="javascript" type="text/javascript"
src="https://online.epmpulse.com/embed?dashboardId=42c5ee97-4837-4c5f-812f-d067fa643d5d&appInstanceId=53D516AE-E4D5-421D-BA13-135BDCC57719">
</script>
Please note: in order to get the App Instance Id, open the PWA Site Contents page, right-click on the EPM Pulse for Project Online app title and select the Copy shortcut option:
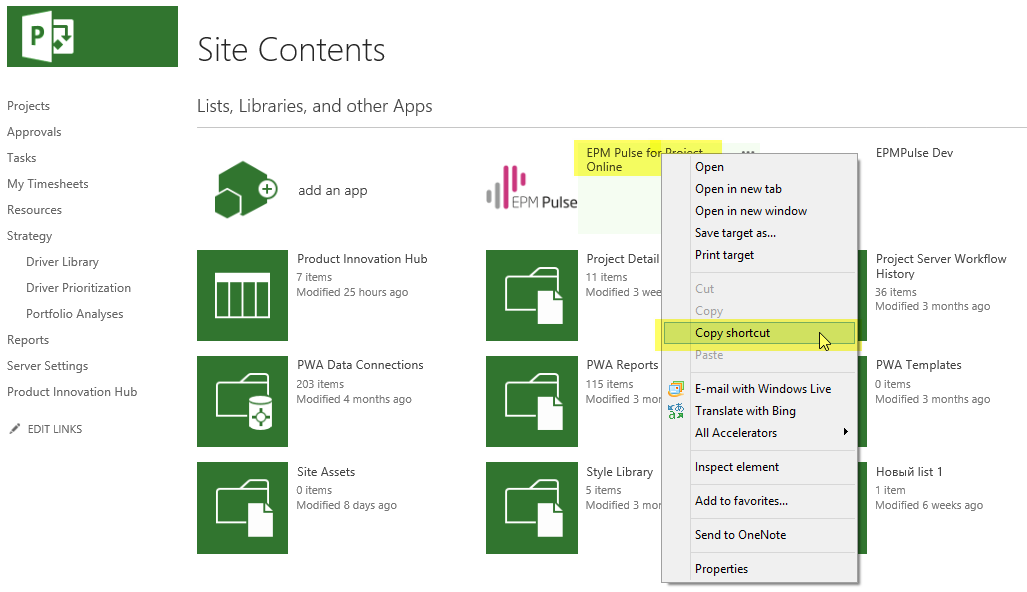
Paste this shortcut into the plain text editor, App Instance Id is the set of symbols in braces right after ?instance_id= :

containerId – this parameter is of text type, by default dashboard will be embedded after the current script tag.
However, you can specify the container, within which the dashboard should be embedded, for example, the sample embed code below allows to embed the dashboard inside of a red frame:
<script language="javascript" type="text/javascript"
src="https://online.epmpulse.com/embed?dashboardId=42c5ee97-4837-4c5f-812f-d067fa643d5d&containerId=mycontainer">
</script>
<div id="mycontainer" style="border: 3px solid red"></div>

8. After the embed code containing all necessary parameters is specified, click OK to close the HTML Source window.
9. Switch to the Page tab on the Ribbon and click the Stop Editing button to save the changes.
10. If the Content Editor web part is set up correctly, you should now see the EPM Pulse Dashboard on you PWA/Project Site page.