Data from the source Excel file is now ready to be imported into the FluentBooks workspace.
When importing each type of data (Resources, Projects, Tasks, Assignments, and Project Artifacts) you will be requested to perform data mapping of source and target fields.
Each data mapping screen has 2 sections:
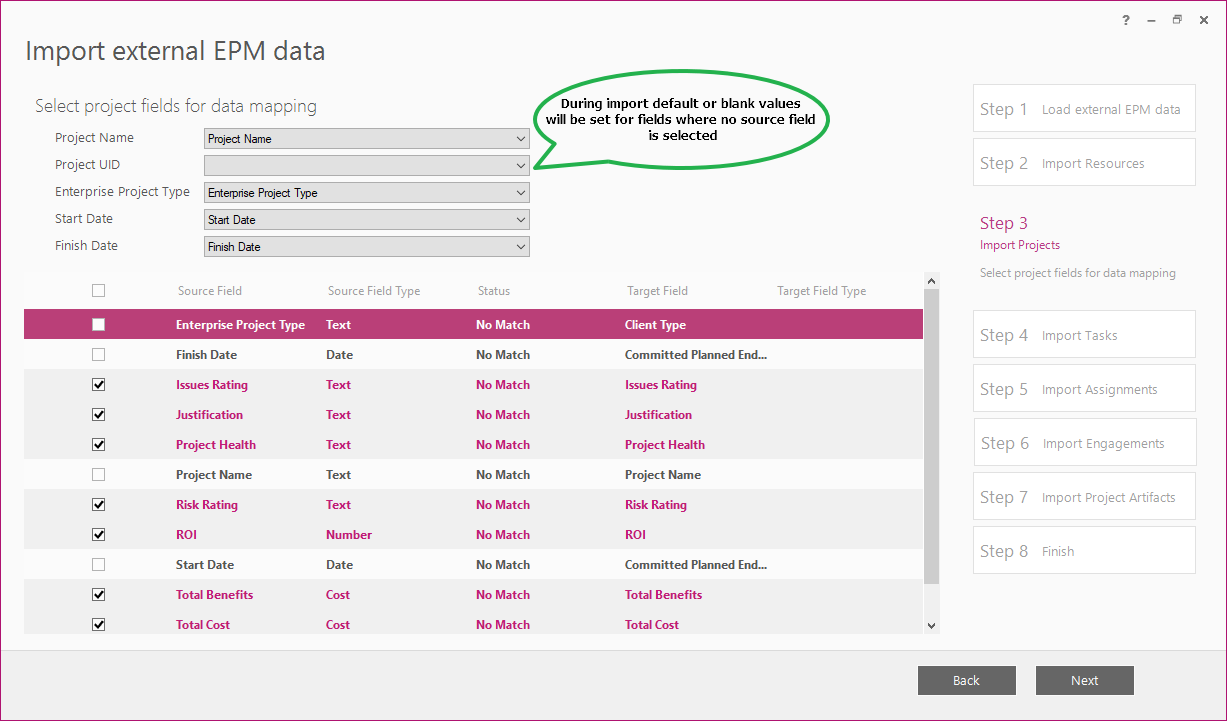
- upper section with dropdowns: these are basic fields that are required for entity creation. FluentBooks will attempt to map these fields automatically, but it is strongly recommended to verify that predefined mapping is correct for each field. In case if nothing is selected in the dropdown for the basic field, then during import default value will be set for this field or it will be left blank.
-
lower section with a grid: these are custom fields from the source Excel file. These fields should be mapped manually.

Please see below the general rules of data mapping applicable to all types of fields:
- When performing mapping for the first time please carefully review all the columns in the grid which need to be mapped to Project Server fields.
- If the field is mapped in the upper section, there is no need to map it in the lower section. In case if a field is mapped in both sections, mapping in the upper section will have priority, and mapping in the lower section will be neglected.
- Check the check-box of custom fields that need to be imported. If a field is not mapped in the upper section and is not checked in the lower section then it will be skipped during import.
- Please make sure to select only those custom fields that are required to be imported, instead of selecting All fields, and check the Field Names and Types carefully.
- ‘Status’ column in the grid presents the comparison status of the source and target fields:
- Exact Match: Field Name and Field Type are identical
- Suggested Match: Field Name and Field Type may not be identical, but are suggested as a possible match. Please make sure that all fields with 'Suggested Match' status are mapped correctly.
- No Match: there is no match between such fields, it is not recommended to map the fields with ‘No Match’ status
- When mapping fields in the grid it is preferable to map source fields to those target fields that are colored with green, which means that such field exists in the workspace and there will be no conflicts when importing such field to the target PWA.
- Enterprise data can fail to be uploaded to PWA in case of incorrect mapping/types mismatch.
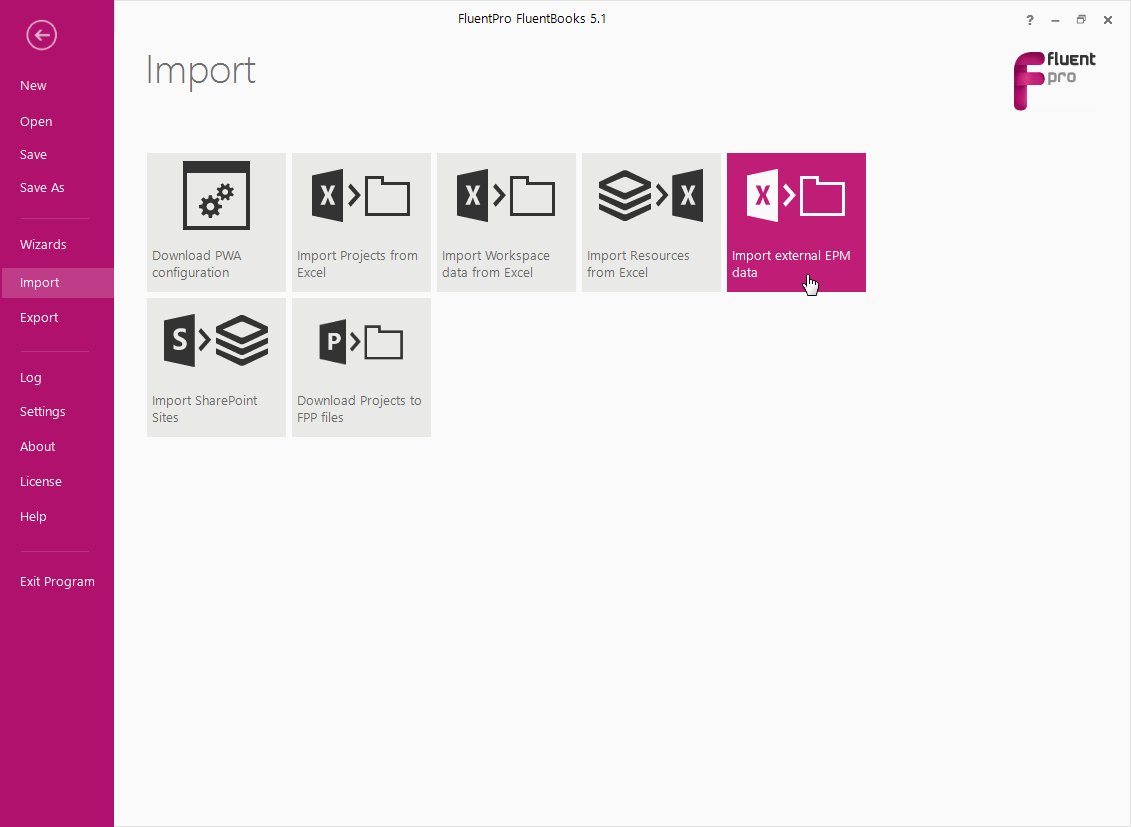
1. Open FluentPro FluentBooks, select the Import option from the File menu, and then ‘Import External EPM Data’wizard.
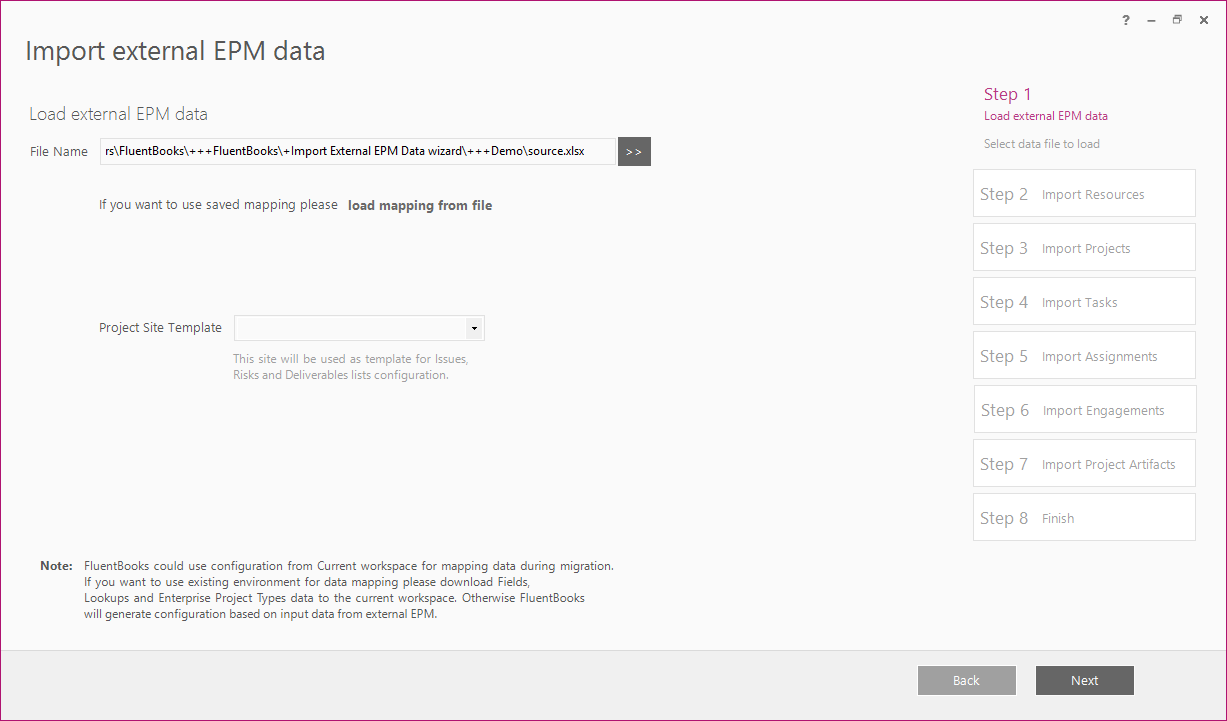
2. Select the source Excel file (the one that was prepared in the previous section of this article). Select a mapping file (optionally). Also, select a Project Site Template that has been created in the target PWA before migration. If no site was created, FluentBooks will create a default Project Site Template. Click Next to load the external EPM data.
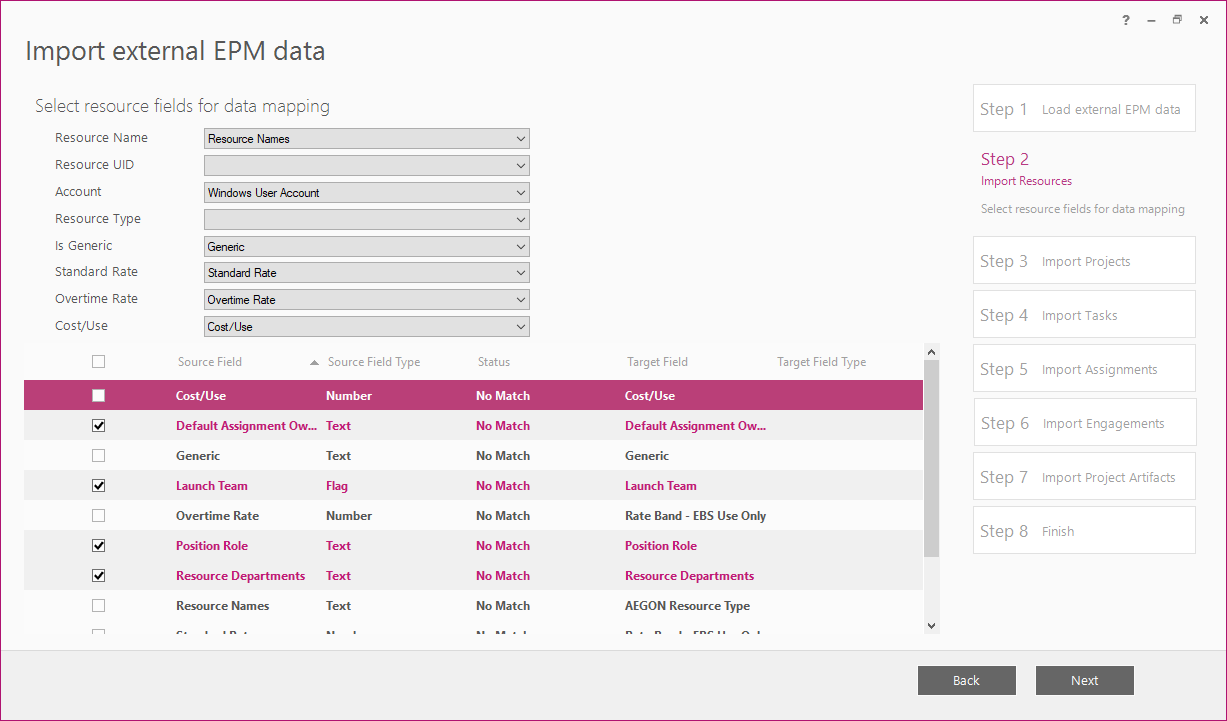
3. Check Resource Fieldsmapping making sure that it is compatible with the general data mapping rules. Correct the mapping if necessary.
Click Next to import Resources data. If new Lookup values were added to the source Excel file, then while importing EPM data from the Excel file into FluentBooks workspace the 'Lookup values are absent in workspace dialog window will appear, allowing the user to decide what to do about these lookup values.
4. Select the 'Add to Workspace' option to add new lookup values to the lookup tables in the workspace.
5. Select the 'Proceed' option to proceed without adding the new lookup value to the workspace. During export to PWA resource with this lookup value will fail to be uploaded.
6. Select 'Cancel to return to mapping.
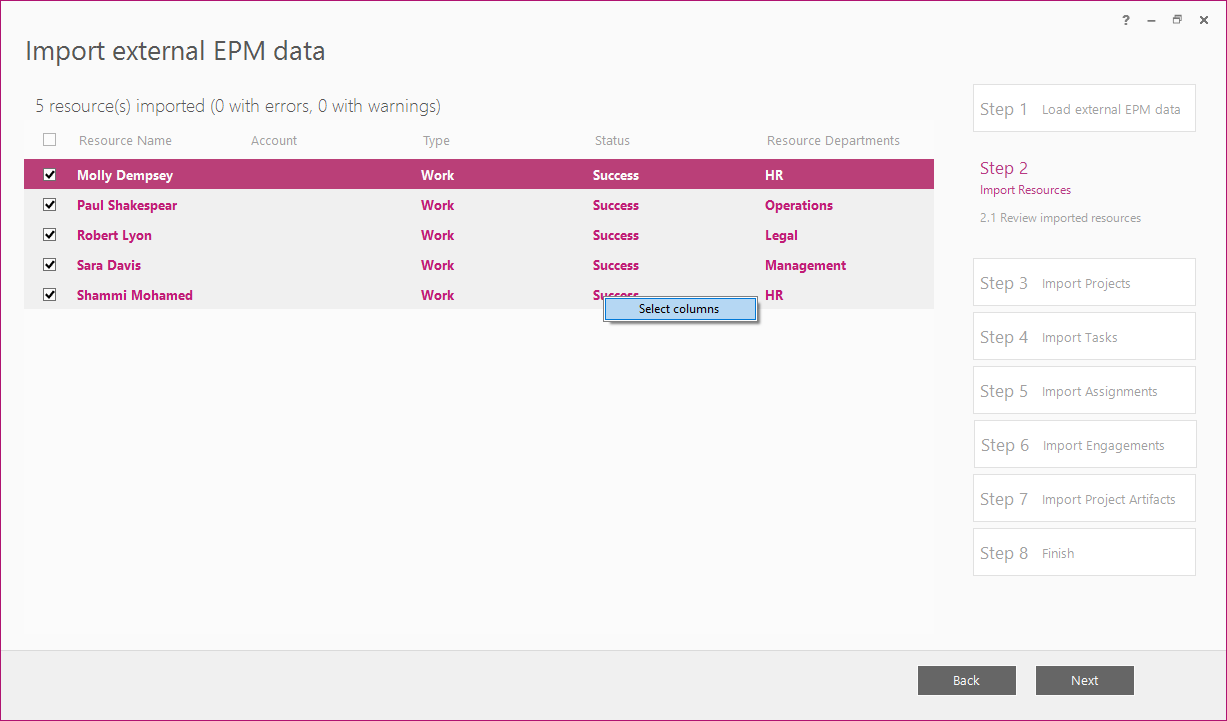
7. Verify the imported Resources.
You can add Resource custom fields to this view in order to verify the imported values: select the ‘Select columns’ option from the right-click context menu, check the necessary columns and click OK. Click Next to proceed after Resources data is reviewed.
8. Check Projects Fieldsmapping making sure that it is compatible with the general data mapping rules. Correct the mapping if necessary.
Click Next to import Projects data.
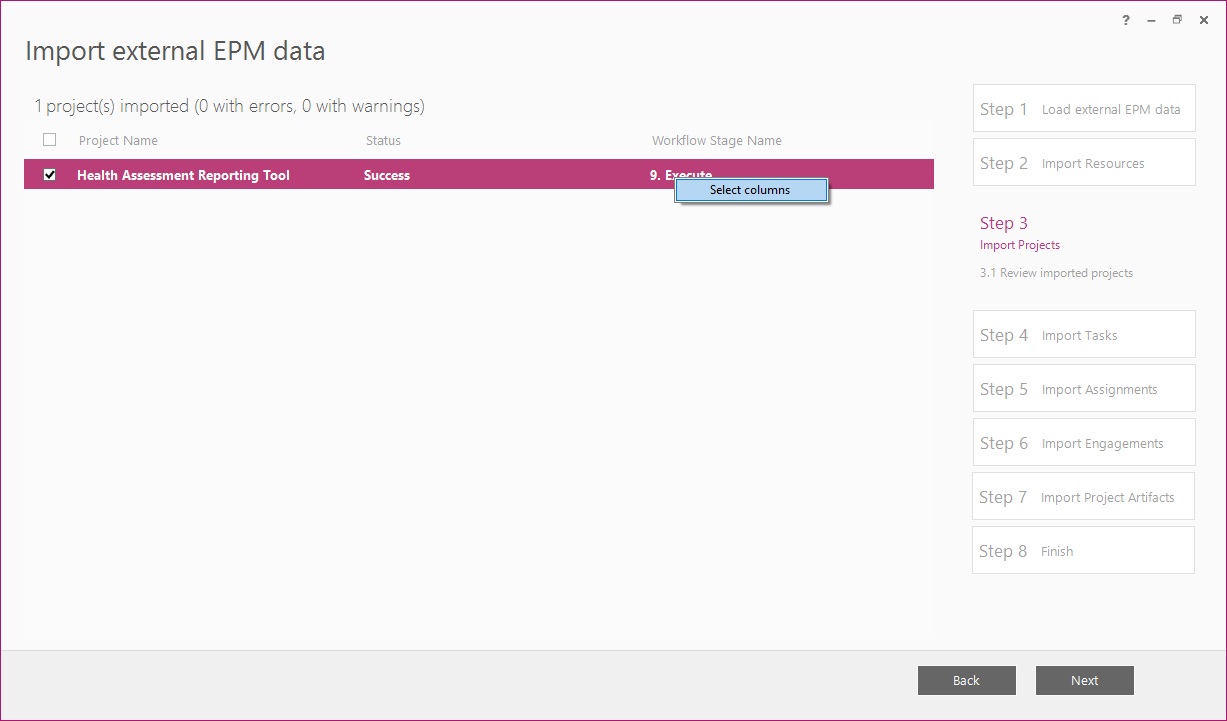
9. Verify imported Projects.
You can add Project custom fields to this view in order to verify the imported values: select the ‘Select columns’ option from the right-click context menu, check the necessary columns and click OK. Click Next to proceed after Projects data is reviewed.
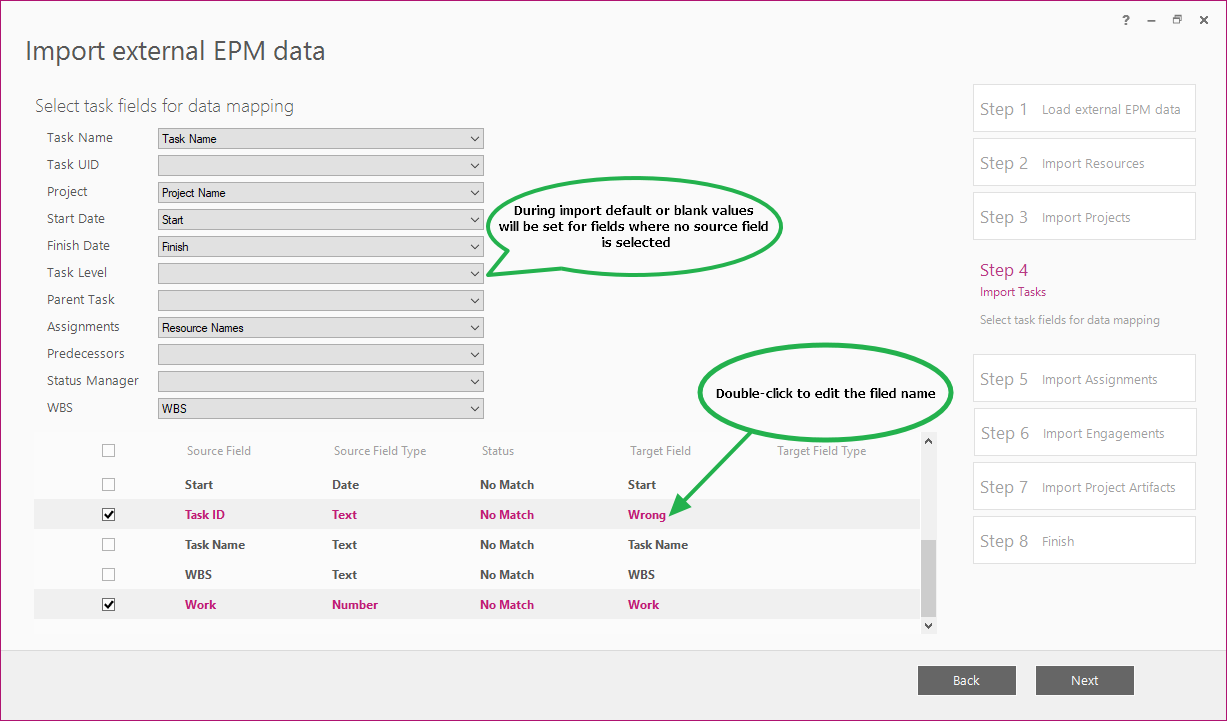
10. Check Tasks Fields mapping making sure that it is compatible with the general data mapping rules. Correct the mapping if necessary.
Please note: If you use the Task ID column for matching Tasks with Assignments, you are required to turn ON the mapping for this column on Step 4 ‘Import Tasks’. If the format of Task ID values fits standard GUID format and you want to save these IDs as the GUIDs of the tasks in Project Server, you should select the Task ID column in the ‘Task UID’ drop-down. If the format of Task ID values does not fit standard GUID format or you do not want to save these IDs as the GUIDs of the tasks in Project Server and would like FluentBooks to generate new GUIDs for the tasks, you should leave “Task UID” drop-down blank and map Task ID column to any field, preferably to an invalid one – just double-click the Target Field value and set it to some invalid value, e.g. ‘Wrong’. Click Next to import Tasks data.
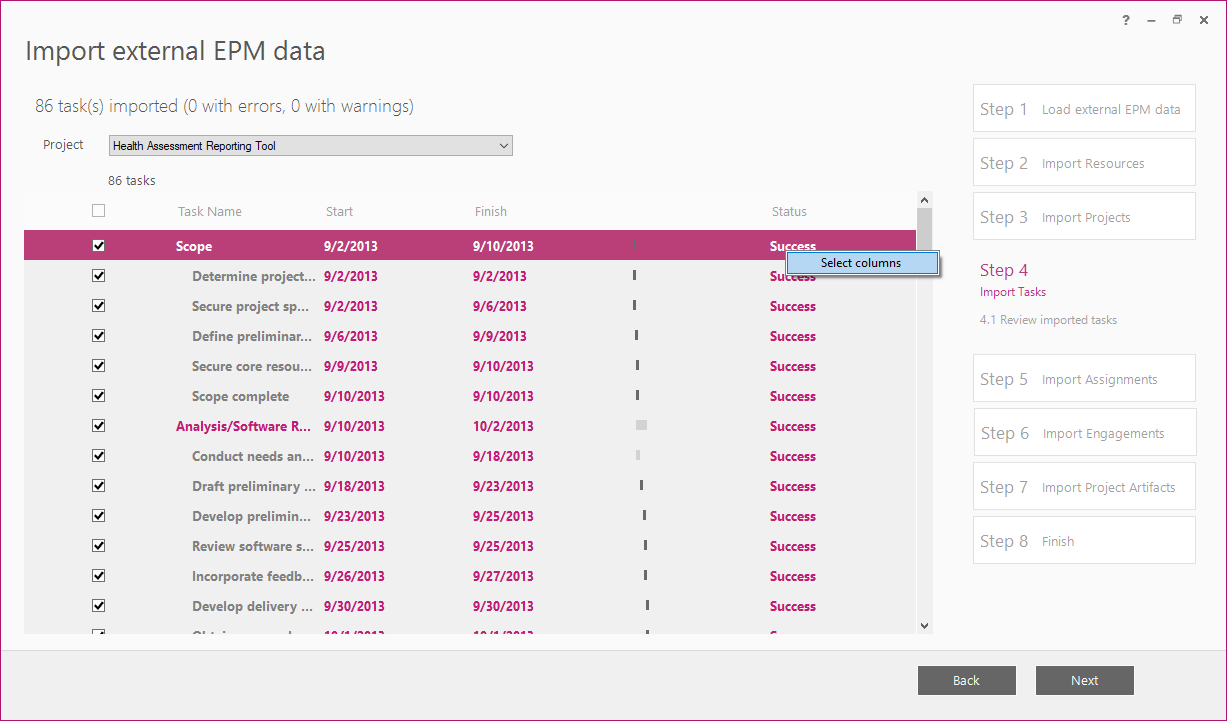
11. Verify imported Tasks and their hierarchy. Select a Project in the ‘Project’ drop-down to view all tasks associated with the project.
You can add Task custom fields to this view in order to verify the imported values: select the ‘Select columns’ option from the right-click context menu, check the necessary columns and click OK. Click Nextto proceed after Tasks data is reviewed.
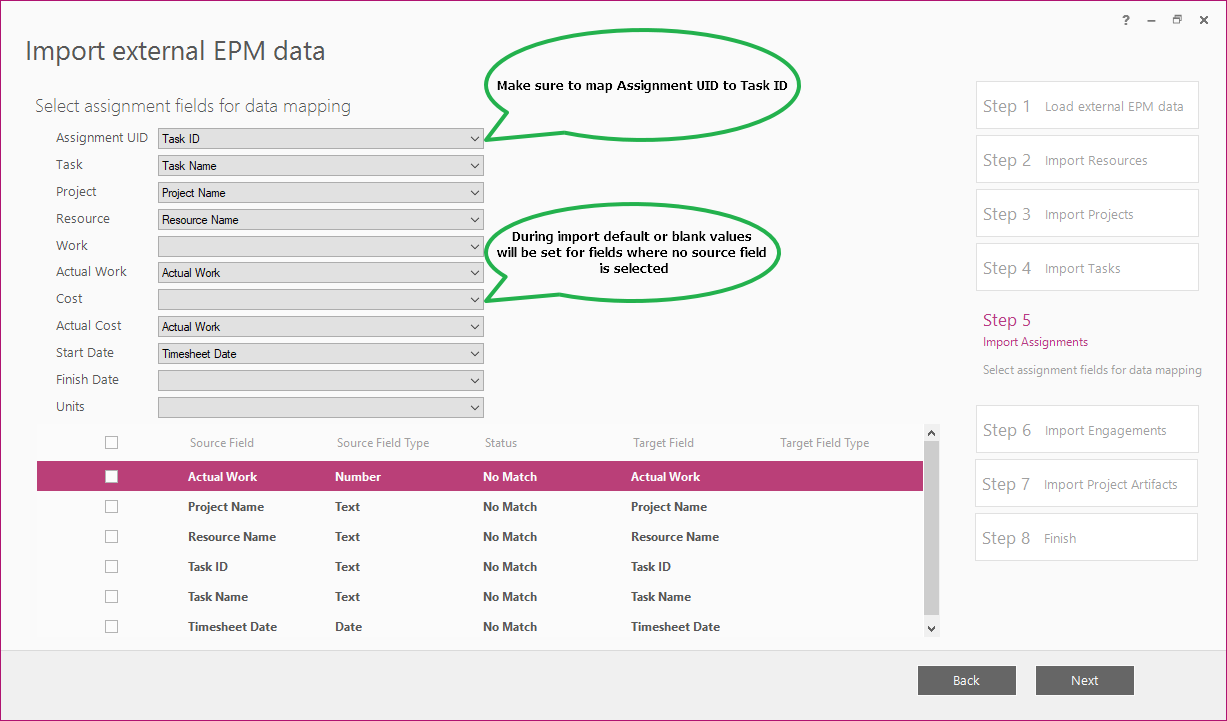
12. Check Assignments mappingmaking sure that it is compatible with the general data mapping rules. Correct the mapping if necessary.
Please note: Map Assignment UID field to the Task ID. Click Next to import Assignments data.
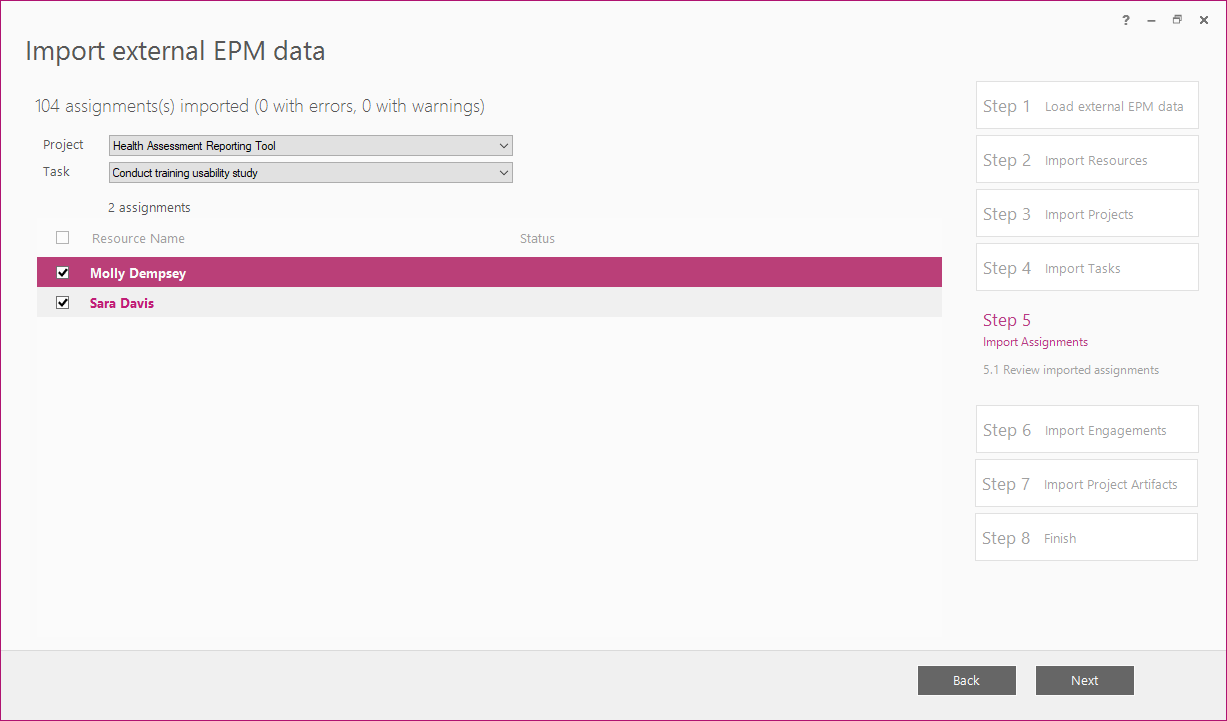
13. Verify imported Assignments. Select a Project and a Task in the ‘Project’ and ‘Task’ drop-downs to view all the Resources assigned to the task.
Click Next to proceed after the Assignments data is reviewed.
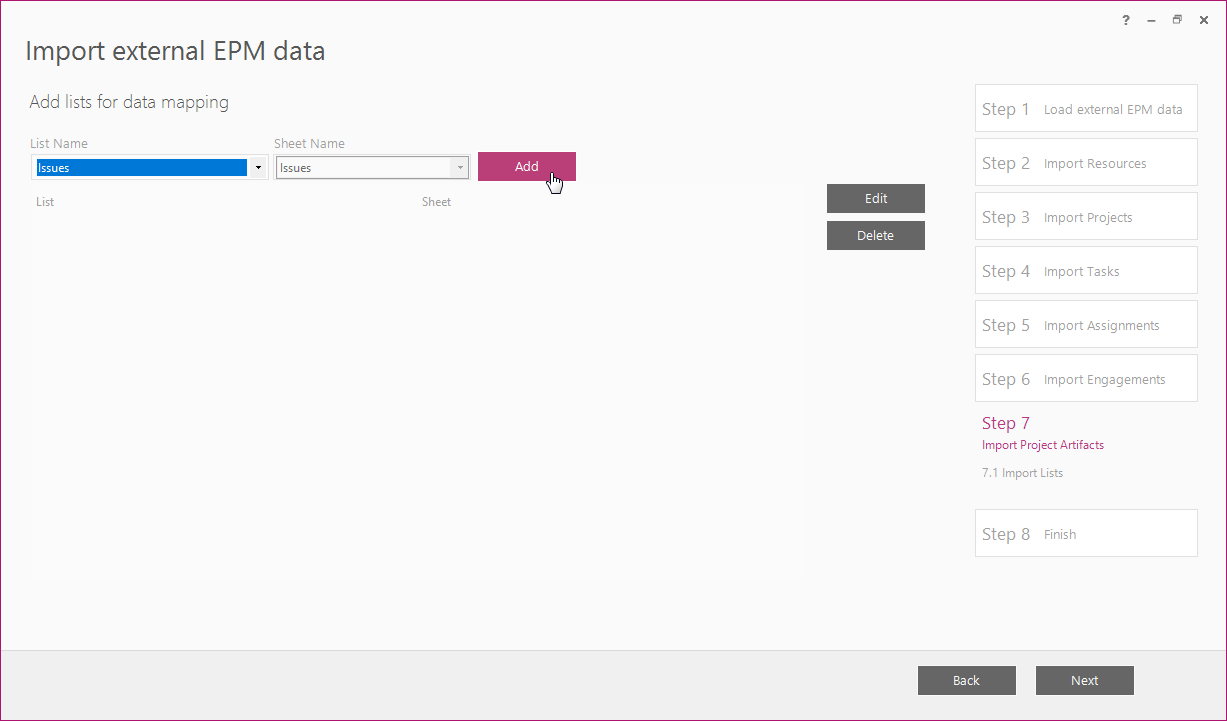
14. Add Lists for data mapping. In this step you should add all Lists, including Custom Lists that you want to Import from the source Excel file for data mapping.
Select a List Name and a corresponding Sheet Name, click Add to proceed.
15. Please note: All Lists, including Custom Lists, are mapped in the same way. In this article data mapping for Issues will be shown as an example.
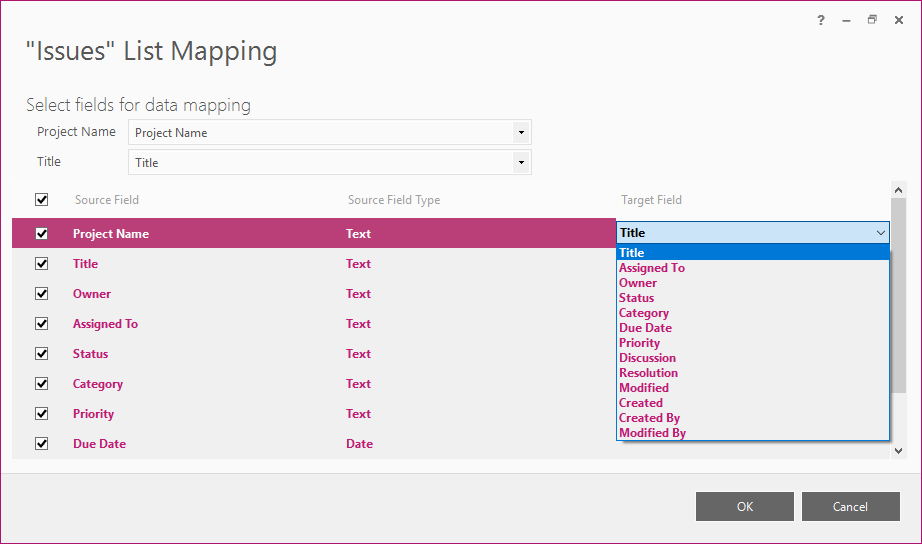
16. To check the mapping for Issues, choose an appropriate Source Field, double-click on the opposite Target Field and select the corresponding Target Field from the drop-down list.
Please note: Project Name and Title are already mapped in the upper section for all Lists. There is no need to map them in the lower section. Click OK to proceed.
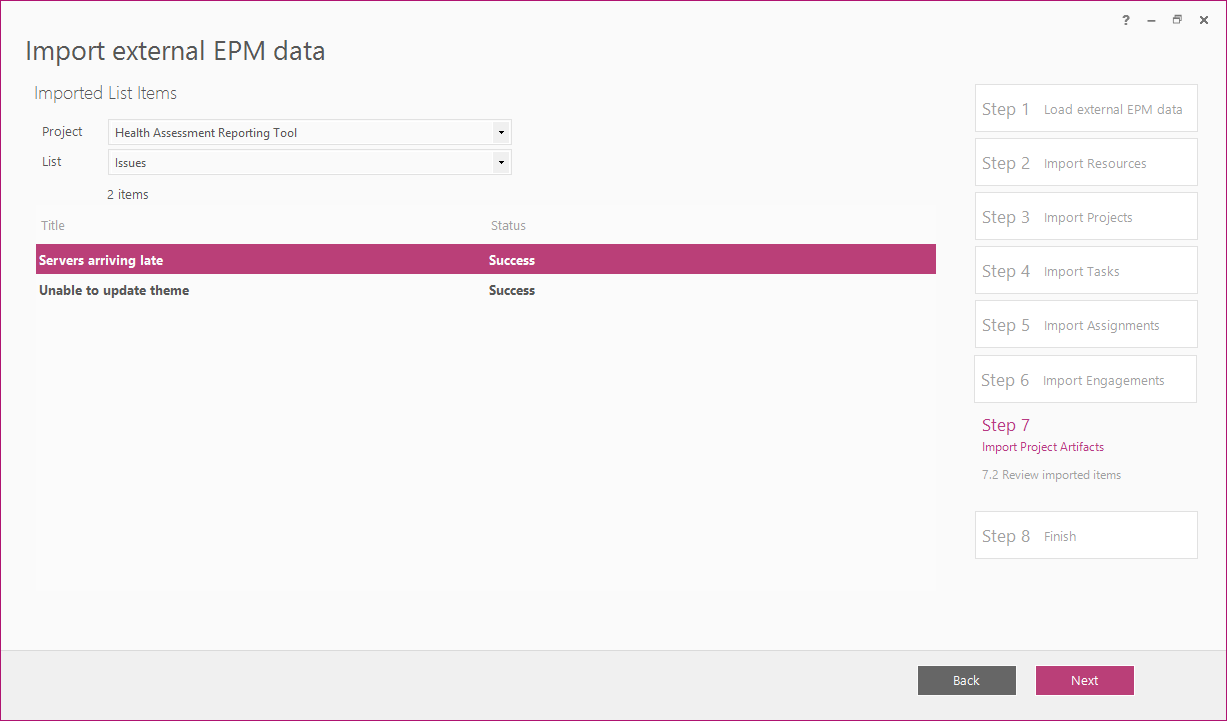
16. Verify imported Lists data. Select a Project in the ‘Project’ drop-down and one of the Lists in the ‘List’ drop-down to view all issues associated with the project.
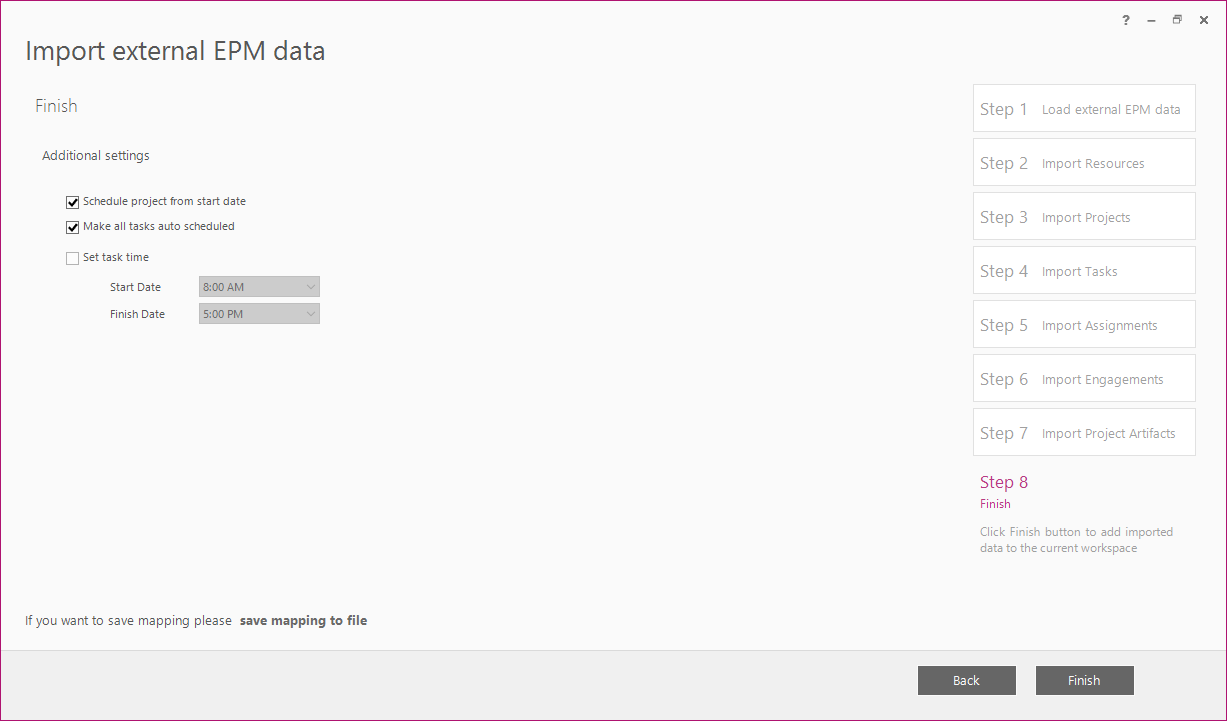
‘Make all tasks auto-scheduled’: check this check-box to make all imported tasks auto-scheduled. ‘Set task time’: check this check-box to set Start and Finish task time for all imported tasks. ‘save mapping to file’: click this option to save the mapping settings to *.fbwm file in order to use during next migrations (Step 1 of the current wizard allows loading mapping setting from file). Click Finish to complete adding imported data to the current workspace.