
This article describes the whole process of Project Online <> Azure DevOps integration scenario configuration.
The article describes the configuration process taking into account every little detail and showing all options that can be selected while configuring it. Even though the article is quite big, the configuration process should not take longer than 15-25 minutes.
In order to quickly configure this integration scenario we recommend to open three windows in your browser at once:
- your Azure DevOps environment (sign in to the applications with the account that have administrator permissions);
- your Project Online environment (sign in to these applications with the account that have administrator permissions);
- Integration Hub application.
It will be much easier to have these windows opened during integration scenario configuration so you could switch between them and configure as required, following the steps below.
Start creating the integration scenario
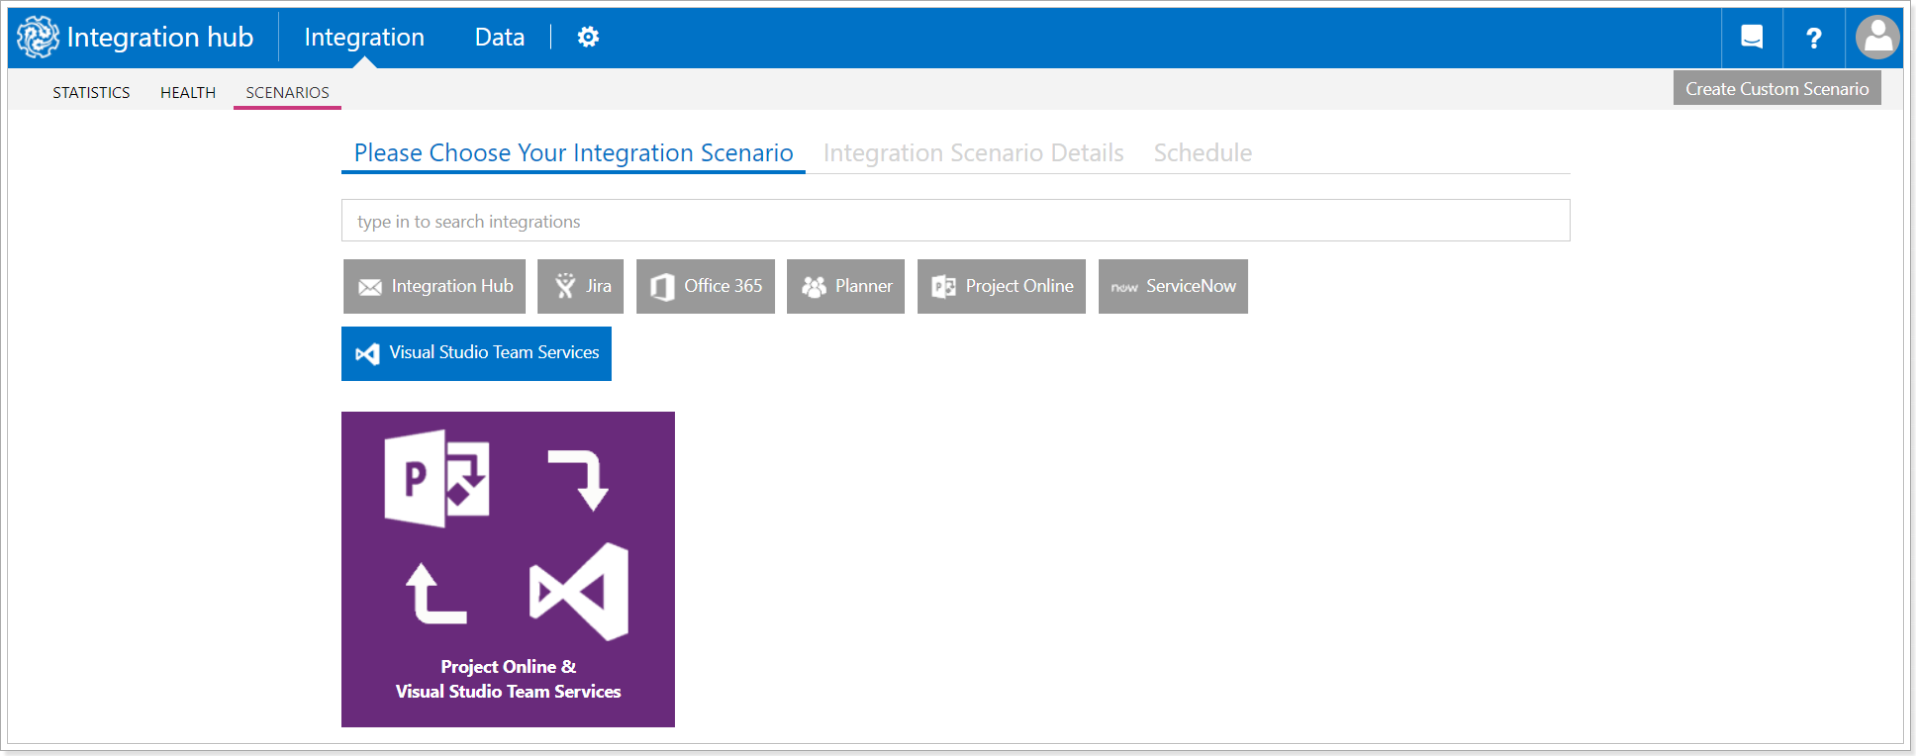
1. The first step will be to create a new integration scenario. Open the Integration Hub app and navigate to the Scenarios tab. Click the New Integration button.

2. Click on the Azure DevOps (VSTS) box to narrow your search and choose Project Online & Azure DevOps (Visual Studio Team Services) scenario.
Create connection to Project Online
3. In the Project Online App Details section, in the Connection field click New and provide the Project Online PWA URL to which you would like to establish the connection.
In Project Online connection there are three authentication options:
-
OAuth
The 'OAuth' authentication type is a standard and preferred option. When it is used, Integration Hub is authorized to access your resources without sharing credentials. The access token is issued to the Integration Hub app by the authorization server, with approval from your side. Integration Hub then uses the access token to access and process your Project Online data and stores the refresh token for continuous integration.
Please note: If you are creating the first Integration Scenario in your Integration Hub tenant and choosing the OAuth authentication type, there might be a problem with the connection to Project Online. If a problem occurs, as a workaround, we recommend creating the first scenario using SharePoint credentials. When the first scenario is created, later on, you can change the authentication type of this scenario for the OAuth authentication type as well, if required. -
SharePoint Online credentials
If the ‘SharePoint Online credentials’ authentication type is selected a connection will be set up via login and password to a connected SharePoint account. In this case, the credentials are stored and protected in the Integration Hub app. Login to the PWA and please make sure that the account used for running integrations has the necessary set of permissions. -
SharePoint On-premise credentials
This type is used for Project Server 2019 and is available for Integration Hub on-premises version only. If this type is selected a connection will be set up via login and password to a connected SharePoint account. In this case, the credentials are stored and protected in the Integration Hub app. Login to the PWA and please make sure that the account used for running integrations has the necessary set of permissions.
Please note: The Project Server you add as a URL in the login field should be within the same domain as the virtual machine where Integration Hub on-premises is installed.
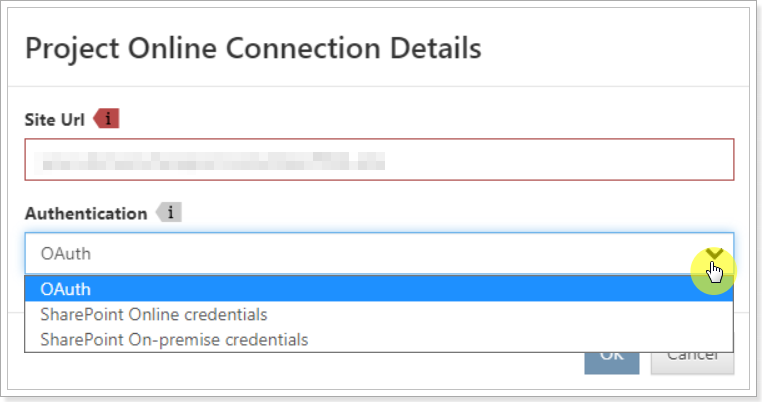
In the example below OAuth, authentication type is selected.

In the window that appears click the Trust it button to trust the application.

Setup Project Online for integration
4. Next, it is required to create the necessary custom fields on the Project Online PWA. This can be done in the following ways:
- Click 'Create' button next to each field listed under Parameters section – the fields will be created automatically on the defined PWA.
- Create custom fields listed under Parameters manually – navigate to your PWA and manually create the needed fields.
Please note: The names should fully correspond to the ones listed under Parameters.
Please note: If you have previously created configuration before 11/15/2017, navigate to your PWA and remove the existing fields to avoid duplicates. After deletion please proceed with new configuration creation.
Click the 'Verify Configuration' button to check if all fields have been created successfully. Then click Next to proceed.

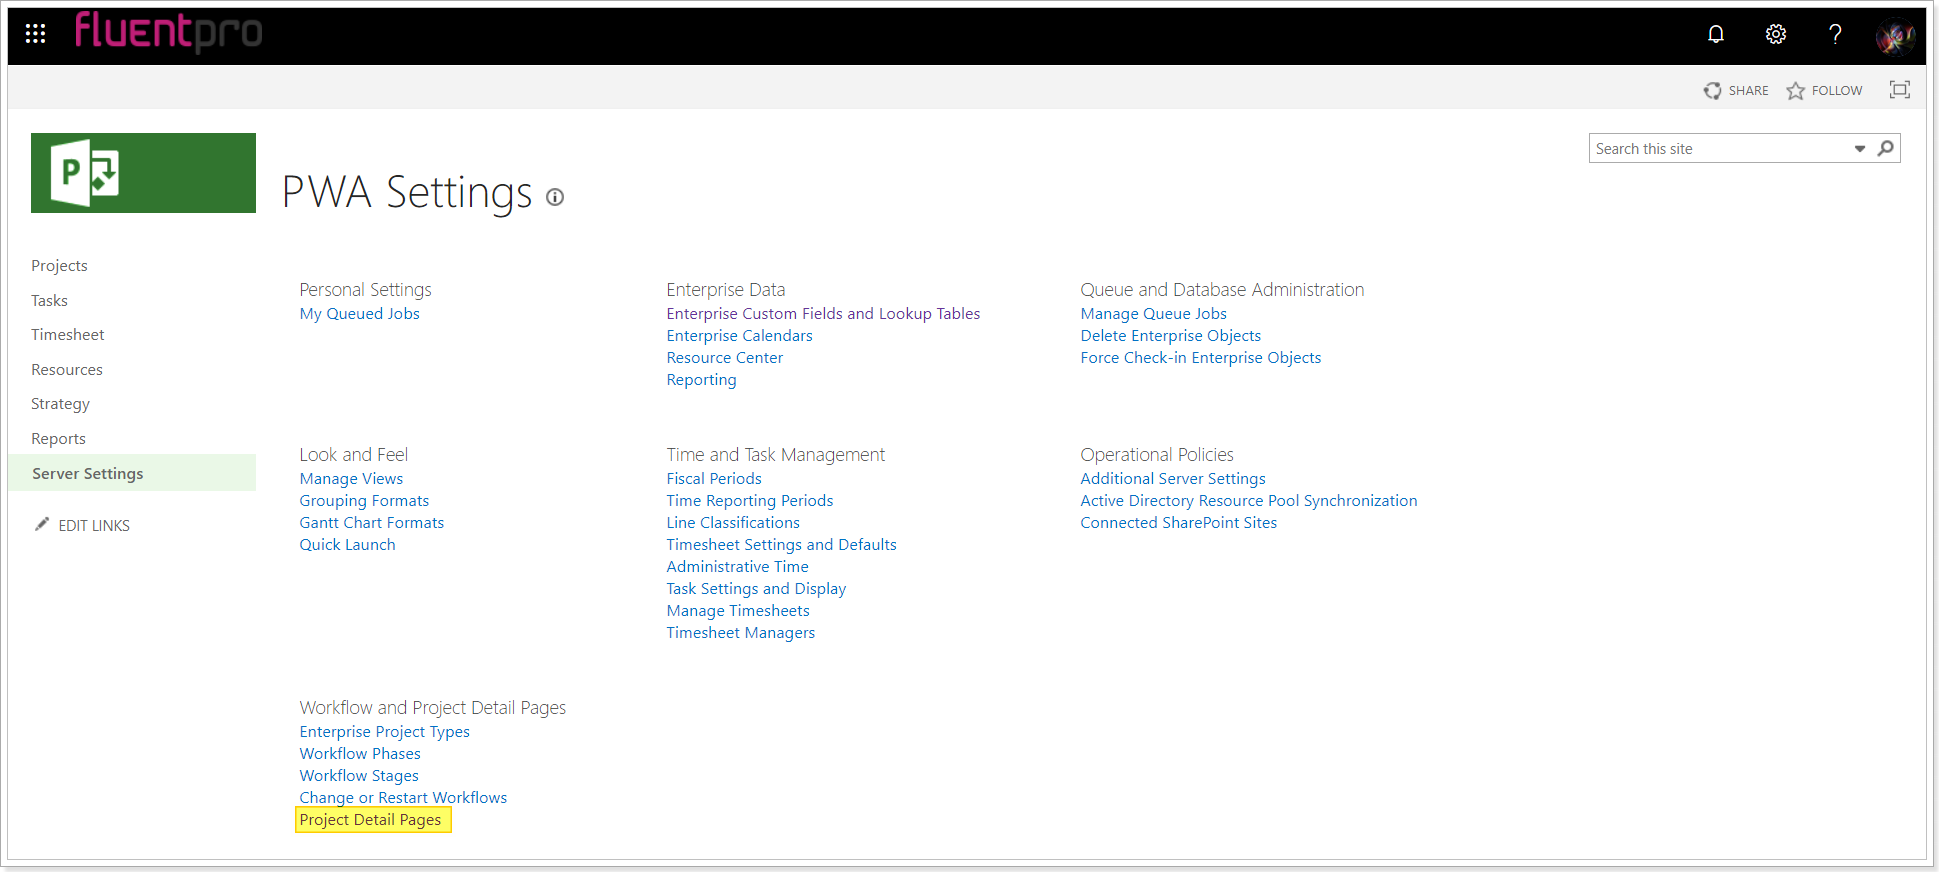
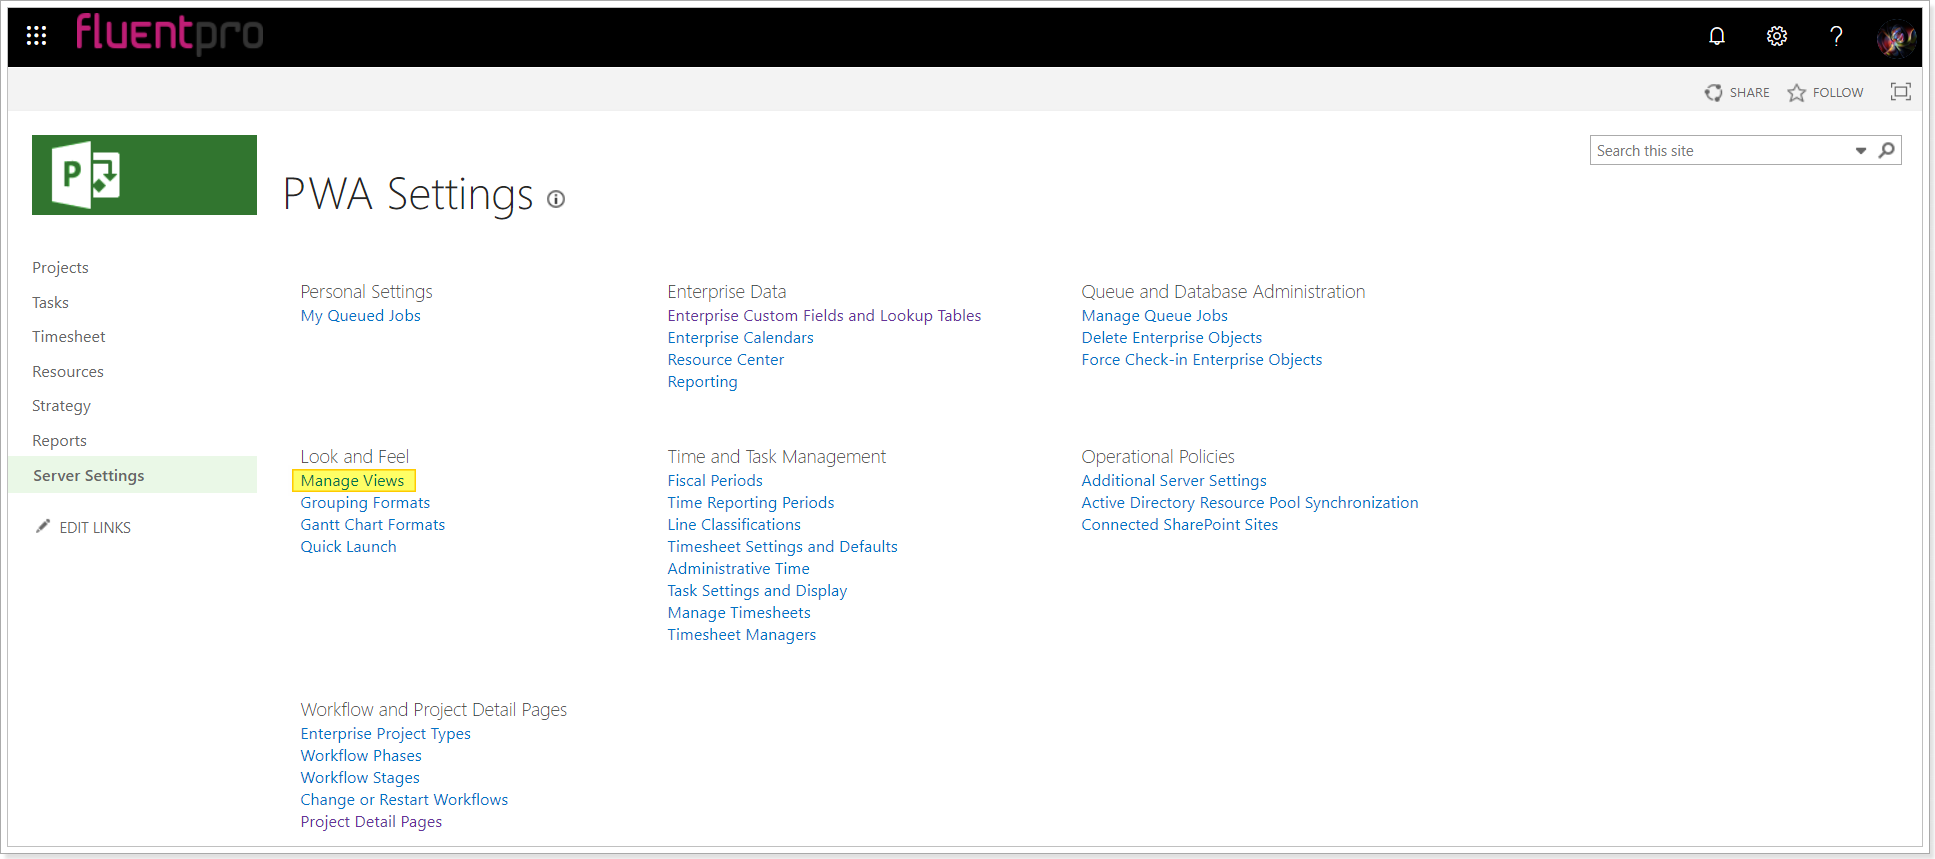
5. The next step will be to add the created custom fields to the required PDPs and Views in Project Online.
Open Project Online environment => Server Settings => Project Detail Pages.
6. Add field “VSTS Project” to the PDP of the Project which will be synchronized. For example, it can be Project Information or a similar PDP.
Open the selected PDP for editing.

Select to edit the PDP page.

Select to edit the web part.
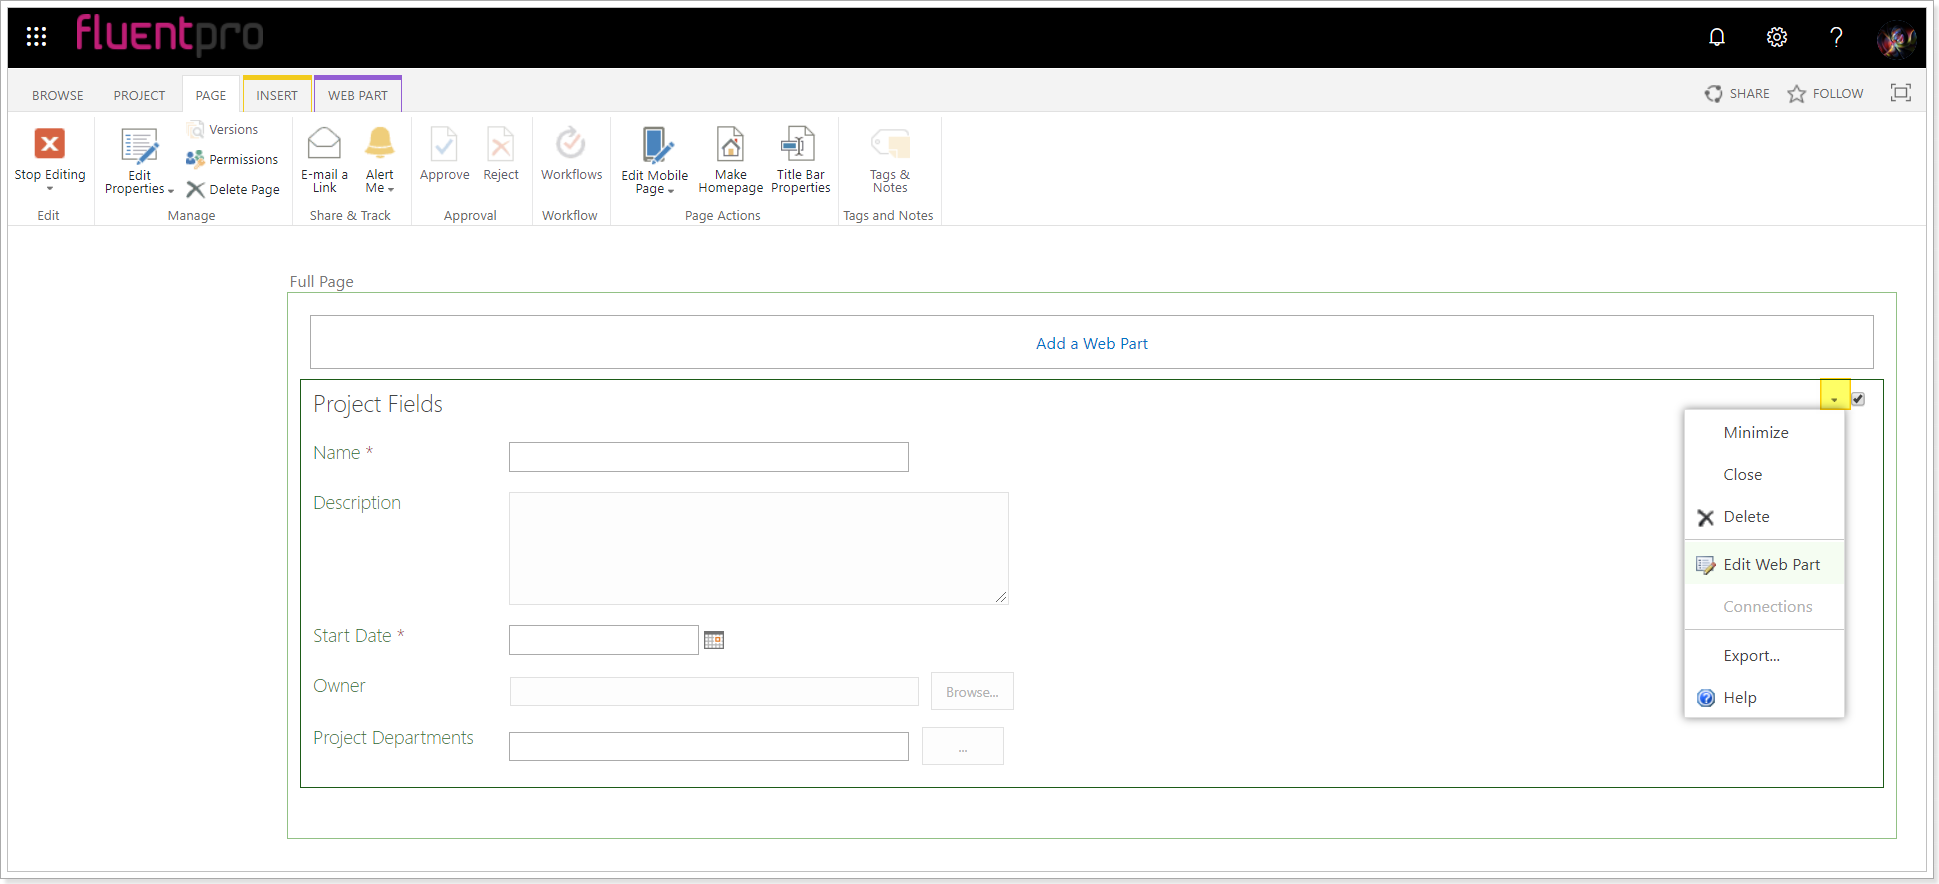

Add VSTS Project field to the web part. Click Ok and Apply to save the changes.

7. Edit “Tasks Summary” View or create new one, and make fields “Sync with VSTS” and “Work Item Type” displayable. Navigate to Server Settings => View Management.
Create a new Project View or edit “Tasks Summary” view and add “Sync with VSTS” and “Work Item Type” fields to this view.
Click Save to save the changes.

Setup Azure DevOps for integration
8. On the next step it is required to configure Azure DevOps site. Integration Hub cannot create custom fields in Azure DevOps automatically, so we will need to add two custom fields to Azure DevOps work item types manually.
Open Azure DevOps environment. Open the Process tab and select to edit the inherited process that is used for the Azure DevOps project(s) that you would like to synchronize with Project Online.
Also, you can create a new inherited process (Agile, Scrum or CMMI) and then create and synchronize new projects from Azure DevOps to Project Online.
We will take an existing Agile inherited process "FluentProAgile" as an example.

9. Next, it is required to add two custom fields to the selected Agile process.
"Sync with Project Online" field is a required field for synchronization and needs to be created for each work item type i.e. Task, Bug, User Story, etc. (this custom field identifies whether a work item should be synchronized with a Project Online project task). You may create a field with a different name, if required, but its type should be Boolean.
"Project Online Project" field is used for cases when your projects that are included in integration from Project Online and Azure DevOps have different project names. In this case a Project Online Project field is created in Azure DevOps. This custom field defines the name of the destination project in Project Online Project for successful synchronization.
To add a Sync with Project Online custom field to the selected process:
- Open 'FluentProAgile' process (any process can be selected according to your needs, we will take this one as an example);
- Click on the User Story;
- Select New Field option;
- Create a Sync with Project Online field (Type: Boolean) for User Story.

Next, on the Add a field to User Story page, select Layout and Create New Group option and create a new Group “Integration Hub”. Click Save.

Next, it is required to add a Project Online Project custom field to your process:
- Open FluentProAgile process (the same process where you have previously added Sync with Project Online custom field, we will take this one as an example);
- Click on the User Story;
- Select New Field option;
- Provide the name for the field: Project Online Project (Type: Text)
- Navigate to the layouts and select an existing "Integration Hub group".
- Add this field to the User Story.

Next, add "Sync with Project Online" and "Project Online Project" fields to other Work Item Types, creating and then selecting "Integration Hub group" in the Layout of each work item type. The following types are supported by Integration Hub: Bug, Task, Epic, Feature, Issue, Test Case, User Story.

Please note: Later you will define the name of the project selected for data synchronization from Azure DevOps in the appropriate Project Custom Field in Project Online. We expect 100% match.
10. Next, create a new Query since Integration Hub adds tasks to the “top” iteration – Matching Azure DevOps Project Name. We recommend creating one Query called “All Tasks” where all tasks will be placed.
For this purpose open the project that you plan to synchronize with Project Online, click Boards => Queries => My Queries => New Query.

Select Tree of Work Items query type and click Save query option, provide the name for it (All Tasks, as an example) and click OK.

11.Add team members to the Azure DevOps project if needed (if you are using newly created project and have resources assigned to tasks).
Please note: Azure DevOps project team members must match with resources in Project Online project team. Mapping is done by EMail. EMail of the Azure DevOps team member must be 100% the same as EMail of work resource in Online on PWA.
Please note: Only Azure DevOps project team members can be assigned to tasks (users must be added to any project team).
12. On the next step, open the Integration Hub app.
Create connection to Azure DevOps
Now we need to set up the connection between Integration Hub and Azure DevOps.
Please note: It is also possible to add Azure DevOps Server connection to the Integration Hub app. For more details please refer to the How to add Azure DevOps Server connection article.
Click New to provide an Azure DevOps account and establish a connection to Azure DevOps.

- Select Azure DevOps Services from the Type section.
- Provide Azure DevOps URL (the initial URL of your Azure DevOps site).
There are two ways how you can authenticate to Azure DevOps: OAuth and Personal Access Token.
If you select the OAuth authentication type, click Ok to proceed.

13. Sign in to Azure DevOps in the appearing window.
Please note: The account used for integrations should have Administrative permissions.
If you would like to use Personal Access Token option, please refer to this article for information on how to create Personal Access Token.
Please note: the following permissions are required:
- Work Items: read & write
- Identity: read
- Project and Team: read & write
When the Token is created, provide the account name and the token to authenticate to Azure DevOps via the Integration Hub app and click OK to proceed.

14. In the Parameters section open the drop-down list of the "Sync with Project Online" field section and select the Sync with Project Online field that you have created in Azure DevOps for each work item type i.e. Task, Bug, User Story, etc. (this custom field identifies whether a work item should be synchronized with a Project Online project task). If you have created a field with a different name in Azure DevOps for synchronization with Project Online, select the field name you have previously created.
"Project Online Project" field is used for cases when your projects that are included in integration from Project Online and Azure DevOps have different project names. In this case a Project Online Project field is created in Azure DevOps. This custom field defines the name of the destination project in Project Online Project for successful synchronization. If the field value is not provided the destination project will be chosen by the name equal to the name of the team project in Azure DevOps (VSTS).

15. The "Allow to sync work items partial hierarchy" option ensures that Integration Hub updates work items without altering their hierarchy. It is recommended to enable this option if not all work items are part of the sync. With this setting enabled, work items selected for integration will retain their parent items during synchronization from Project Online to Azure DevOps. However, if the hierarchy in Project Online changes, it will still remain as initially set in Azure DevOps.
If this option is turned off, the hierarchy may be changed during synchronization. However, if not work items are selected for the sync, they can lose their parent items, and the structure might be changed in Azure DevOps.

16. Click Verify Configuration button to check if everything is configured successfully.
Click Next to proceed.

Configure the Project Online & Azure DevOps fields mapping
16. On the Mapping page review the fields mapping. It is also possible to add more fields, if required. Click Next.

Integration schedule configuration
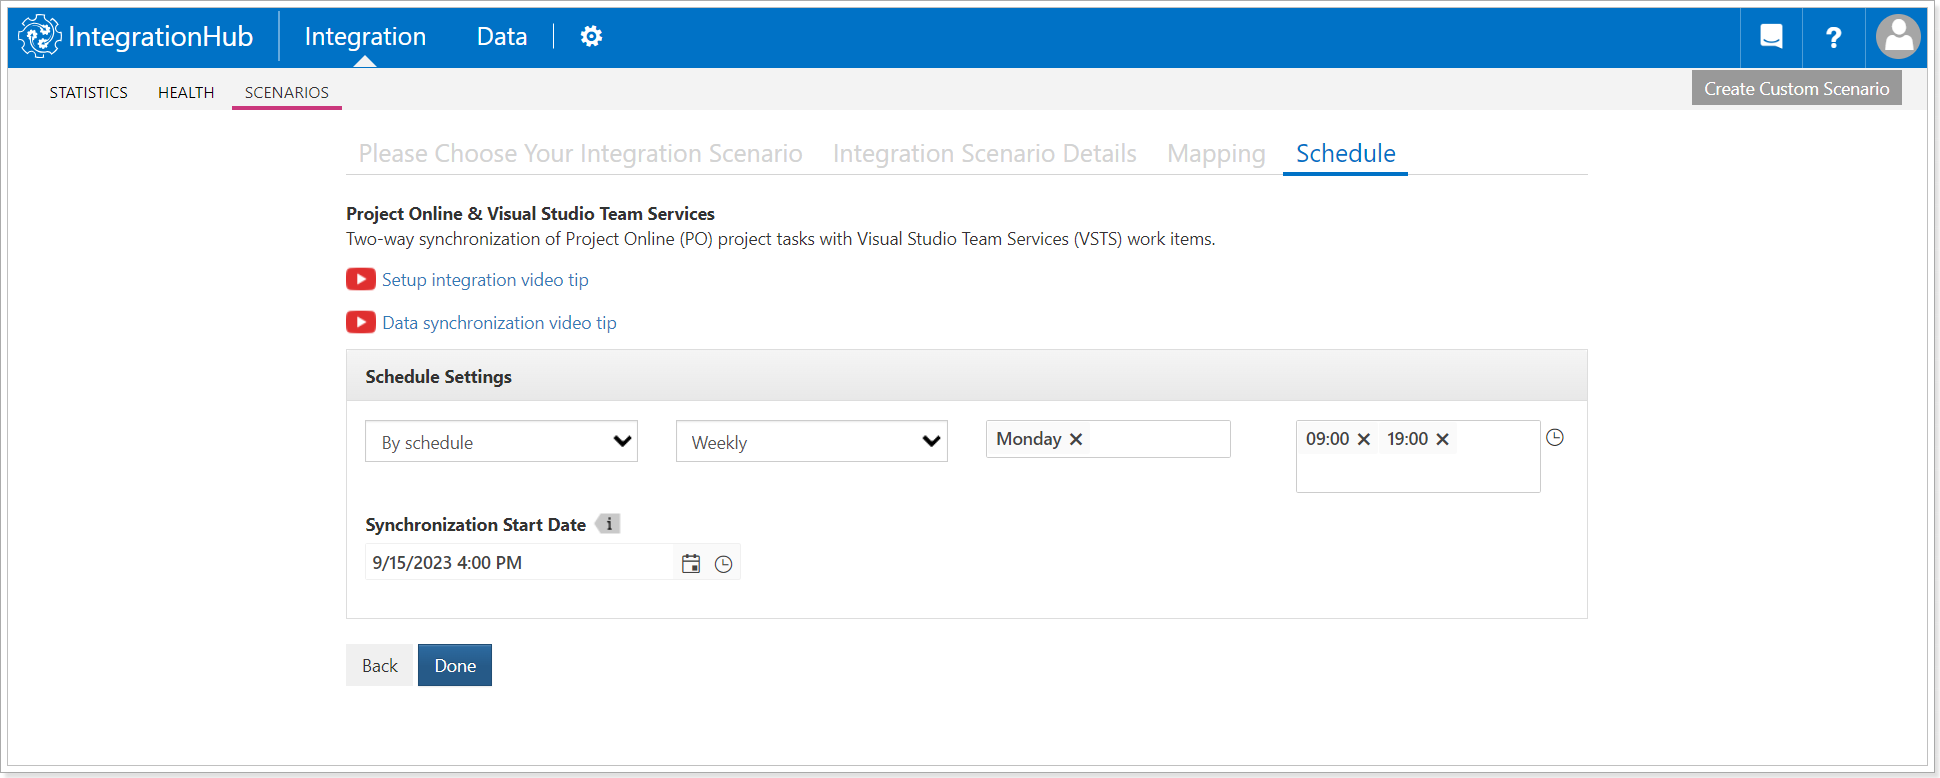
17. On the Schedules page in the Schedule settings select how the synchronization will be performed: On-Demand or By Schedule (daily or weekly). Set how often the synchronization will take place, if you would like the synchronization to be done by schedule and a time frame for integration.
Synchronization Start Date option is very important. The date that you select here is a critical one. It defines the date starting from which Integration Hub will be scanning Project Online projects and tasks and synchronizing them to Azure DevOps.
Tasks that were created prior to this date will not be taken for integration.
Click Done to proceed.
18. You will see two integration scenarios that can be launched:
- Sync Project Online Tasks with Azure DevOps Work Items;
- Sync Azure DevOps Work Items with Project Online tasks.
Please note: Master Projects are not supported for integrations.

Congratulations! The integration scenario configuration was performed successfully!
When the integration is configured, data synchronization will be performed automatically (on demand or by schedule) for all projects and work items where the required fields are added and set up for synchronization. You can configure as many projects as required for data synchronization.
Now let's launch the first synchronization and make sure that everything works as expected.
For the details instructions on how to run your first integration please refer to the Running your first integration article.